Showing posts with label Tutorials. Show all posts

Tuesday, September 22, 2020

Mondrian Inspired Quilt Top

This is the quilt top I made for my nephew T and his fiance S.  He requested a maroon and gray quilt.  He said that it would be really neat if I could design it after his favorite artist, Piet Mondrian.  Mondrian's work is mostly primary colors in squares and rectangles with black lines separating them.  


I decided to make the quilt in blocks and rows to simplify things.  I didn't want any partial seams.  I used a simple trick which I learned from Christina Cameli to make the block math easier.  It you slice into a block and add a one inch wide strip, you don't change the size of the block at all.  The one inch piece equals all the seam allowances.  

I thought I would share my process here in case anyone would like to make a similar quilt.  


I bought one yard each of four different fabrics plus two yards black for the outlines, sashing, border, and binding.  (1.75 yards black was enough but I like to have extra on hand.)

I started by cutting out five 14 inch squares from each of the four fabrics.  I put them all on my design wall.  My plan was to make four each of five different blocks.  


I cut the black out as I needed it to prevent fraying.  I cut one fourteen inch WOF strip from the black fabric.  Then I cross cut 42 one inch pieces.  Four of them were cut down to 1 x 9 inch pieces.  Then I cut six one inch by WOF strips for the sashing between rows.  The border is seven 2 inch wide strips.  The binding is seven 3 inch wide strips.  (I like it extra wide when I have minky on the back.)  

Block A is just a 14 inch square unfinished.  So it was already done.  


For block B, I cut one 14 inch square of each fabric in half.  I mixed up the rectangles, and sewed one 1 x 14 inch black strip in the middle of each set.  I always pressed towards the black strip.  


There were two steps for Block C.  I again cut one of each large square in half.  Then I sewed one skinny strip between two 7 x 14 inch rectangles twice.  (Using one of each fabric.)  


Then I cut each of those pieced sets in half again.  I added a plain 7 x 14 inch rectangle to three of them.  I left one unsewn so that I could offset the blocks in the even numbered rows.  


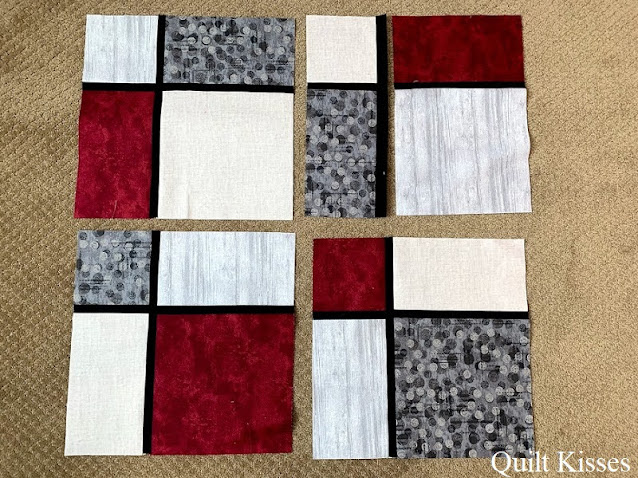
For block D I cut a five inch strip off of one of each large square.  Then I added a skinny strip to sew the 5 x 14 inch rectangles to the 9 x 14 inch rectangles.  


I once again cut a five inch strip from each set.  I mixed them up, added a skinny strip, and got these four blocks.  You can see that I didn't fully sew the upper right block together.  That is to offset the even rows.  


For block E I cut a five inch strip off of one of each large square.  Then I cut the 9 x 14 inch rectangle in half to get two 7 x 9 inch rectangles each.  


 Then I mixed up the pieces so each block had three different fabrics.  


I sewed a 1 x 9 inch strip between the 7 x 9 inch rectangles.  Then sewed a 1 x 14 inch strip between those sets and the 5 x 14 inch rectangles.  


I put all of the blocks up on my design wall.  Row 1 has four full blocks.  Row 2 has three full blocks and the two partial block D pieces on each side.  Row 3 has four full blocks.  Row 4 has three full blocks and the two partial block C pieces on each side.  Row 5 has four full blocks.  

Because each pieced block is still 14 inches (unfinished size) you can place any block any where and rotate however desired.  I moved the blocks around a lot.   


It was a little hard to visualize the end product, so I pinned up some one inch strips to see if I liked the layout.  


I decided that I liked it, so I sewed each row with a skinny strip between each block.  I sewed a long 1 inch strip between each of the rows.  (That took six one inch by WOF strips.  One and a half between each row of blocks.)


I wanted a slightly wider border, so I cut it out at 2 inches.  


I love how the quilt top turned out.  My art teacher sister said that she could definitely see the Mondrian influence.  (She knew who he was.  I had to look him up on the internet.)  

This quilt is already finished, but I will share that in my next post.  This one is already pretty long.

XX,
Jasmine


Monday, September 17, 2018

Quilting Spirals and Paisleys


Some sweet people have mentioned that they liked how I combined spirals with paisleys on my Starburst quilt.  They even said that they might want to try it sometime.  I wanted to put some of my thoughts together on the combined design to provide a starting place.  I think that machine quilting is a lot like handwriting.  We write the same letters, but put our own slant on them. 

I think that spirals and paisleys combine so well because they are both rounded and both have points.  Plus the way I quilt them, they both echo inside and outside easily.  I call these my open design spirals and paisleys because each motif is not closed like images in a coloring book. 


First, paisleys are not tear drops.  They are more like a plume with a curving arc.  I like to think of the yin and yang symbol, how the black and white curve around each other and fill the space.  When I do paisleys I stitch the outside first and then echo inside once.  I feel like I end up with a prettier paisley doing it that way. 

Second, I like to think of cinnamon rolls when I quilt a spiral.  To fill up the space I frequently add hooks to my spirals.  Sometimes I add more than one hook. 

Third, with any design you quilt you need to know how to travel to get to another area.  I echo around previous motifs to get to another quilting space.  You also need to know the best place to stop and plan your next quilting direction.  Stopping at any of the points in either spirals or paisleys works well to hide those start and stop places. 

When combining designs I first like to look at each motif separately. 


Paisleys are fun even by themselves.  Melissa Corry from Happy Quilting has a great echoed paisley video which helped me a lot. 


With paisleys you can make butterfly wings, hearts, vines, groupings of three or combinations in random directions.  I have drawn them out in the image above.  The asterisks is my starting place. 


Hooked spirals is one of my favorite designs.  Angela Walters has a great swirl hook video tutorial


When quilting or doodling spirals just remember to leave room to come out after you have quilted to the center. 

As I mentioned earlier, I combined the spirals with the paisleys to quilt Starburst. 


I mostly combined them in a random fashion like in the picture below.  I never counted how many spirals or paisleys I did in a row.  My goal was just to fill the space evenly with both designs.  I naturally quilted more paisleys than I did spirals. 


However, there were two combinations I especially liked. 


I quilted a spiral at the top of a paisley vine.  It reminded me of a flower above the leaves.  I also quilted paisleys in the same direction around a spiral.  It reminded me of feathered spirals. 

Starburst (which measures about 58 by 72 inches) was quilted in about two hours on the Bernina Q24 longarm machine.  It went quickly by leaving the designs open and echoing to move around them.  Here are a couple more pictures which show the quilting a little better. 


 I always recommend doodling designs before actually quilting them on a quilt. 


Have you ever quilted a spiral and paisley combo?  I would love to see your work if you try it or have already done it. 

XX,
Jasmine

Friday, September 11, 2015

Charming Stripes Quilt Tutorial

Baby Quilt Tutorial

I recently made thirteen quilt tops using this simple design, and thought that others might like to see my method for making them.

20 quilt tops donated for Cheetah's Eagle Scout Project.  13 use the tube method in this tutorial.

I used the tube method which I learned when making my Colorsplash Trip Quilt in 2007. It is also the method used by Bonnie Hunter with her Scrappy Trips Quilt.   If you are already family with the tube method, be sure to check out step 10.  That is what I learned to do to make sure I unpick the correct seam.


For this simple baby quilt top you will need:

  • 10 fabrics in sixth yard cuts ~or~ 5 fabrics in third yard cuts
  • Half yard fabric for the border
This tutorial was an afterthought, so I don't have pictures for every step.  However, I hope you still find this helpful.  :)

Step 1:  Cut ten 5 inch strips by the width of the fabric.  Cut five 3 inch strips from your border fabric, set those aside for now.  

Step 2:  Lay the 5 inch strips out in the order preferred.

Step 3:  Sew all ten strips together so they line up on one side.  Do not press any seams as you sew them together.  


Step 4:  Press seams toward the even rows, but do not press the seam between rows 5 and 6.

Note:  I pinned Post-it notes to the even rows with arrows showing pressing directions.


This is what it will look like on the back after the strips are pressed.


Step 5:  Fold the strip set in half and sew row 10 to row 1 making a tube.


Optional:  Press seam between rows 5/6 and 10/1 flat.

Step 6:  Lay the tube on your cutting mat and cut off the selvages on the side where they line up.  (I walk to the opposite side of my cutting table to do this.)  My 24 inch Omnigrip ruler was perfect for this tube.


Step 7:  Cut four 5 inch strips/columns.


Note:  I like to line up the horizontal lines/dots with the edges of the strips as I cut to make sure it stays square.


Step 8:  After cutting four columns, slide the strip set over on the cutting mat and square up the edge again.  (Once again I square up the edges from the opposite side of my cutting table.)


Note:  It is very important to keep the columns square or they will bow once unpicked.

Step 9:  Cut four more 5 inch columns for a total of eight columns.

Step 10:  Turn your tube columns right side out and determine a layout.  You will only see half of the quilt top at this point because they are all in tubes.  **I find this step extremely helpful because it can be so easy to unpick the wrong side of a square when the columns are in tubes.**


Note:  If you are only using  two each of five different fabrics, place a pin in row 1 of your original strip set after cutting the columns.  I learned the hard way that one of each fabric will end up in an even row, and one of each fabric will be in an odd row.


Then when you lay out the tubes make sure the pinned squares are in a diagonal row.  This will keep your seams nesting together nicely.  


Step 11:  Unpick the top seam from the layout in step 10.


Optional:  After unpicking quickly press the seams in each column so they are pointing towards the even rows (especially between rows 5/6 and 10/1).  Also press the top and bottom of each column where the tube was unpicked.

Step 12:  Line up each column on the design wall to double check the layout.


Note:  I like to use numbered flower pins which I leave in the top square of each column to keep the columns in order as I sew them together.


Step 13:  Sew columns together in pairs.  The seams should all nest as you are going.  I did not even pin and still achieved great points.


I pressed the seams toward the bigger column number (the right in this picture)


Step 14:  Continue sewing the columns together and pressing to complete the center portion of the quilt top.


Step 15: Take three of your 3 inch border strips (from step 1), cut off the selvages, and sew them end to end to form one long strip.  (The sides of your center section should measure about 45.5 inches, so one width of fabric strip will not be long enough for your side borders.)

Step 16:  Add your side borders.  Both of the side borders will come from the long strip sewn together in step 15.  Remember to measure your center section and cut the border strips to the correct size.  Pin the borders, sew, and press toward the border.


Step 17:  Add your top borders in similar manner using the other two 3 inch strips from step 1.  Remember to measure your quilt top and cut to the correct size.


Now you have a completed quilt top which will measure about 41.5 by 50.5 inches.  I love this method for sewing them together and love how all of the seams nest together.  This is what the back of the quilt top looks like.


And just for fun, here is the quilt top with light shining through.  I love the stained glass look.


Note:  I do think that a wider border looks better with the 4.5 inch finished squares, but I chose 3 inch cut borders because I could just use the width of the fabric for the backing.  I made a similar quilt with two borders last year.


It was a little larger and required me to piece the back.  (Not the prettiest backing because I was just using up stash fabrics.)


I named this design "Charming Stripes" because the diagonal stripes are made with 5 inch squares.  Please let me know if you have any questions.

XX,
Jasmine

P.S.  I will be linking up with some of the fun parties on my sidebar.  Check them out to see what other quilters are doing.