Showing posts with label Machine Quilting. Show all posts

Monday, September 17, 2018

Quilting Spirals and Paisleys


Some sweet people have mentioned that they liked how I combined spirals with paisleys on my Starburst quilt.  They even said that they might want to try it sometime.  I wanted to put some of my thoughts together on the combined design to provide a starting place.  I think that machine quilting is a lot like handwriting.  We write the same letters, but put our own slant on them. 

I think that spirals and paisleys combine so well because they are both rounded and both have points.  Plus the way I quilt them, they both echo inside and outside easily.  I call these my open design spirals and paisleys because each motif is not closed like images in a coloring book. 


First, paisleys are not tear drops.  They are more like a plume with a curving arc.  I like to think of the yin and yang symbol, how the black and white curve around each other and fill the space.  When I do paisleys I stitch the outside first and then echo inside once.  I feel like I end up with a prettier paisley doing it that way. 

Second, I like to think of cinnamon rolls when I quilt a spiral.  To fill up the space I frequently add hooks to my spirals.  Sometimes I add more than one hook. 

Third, with any design you quilt you need to know how to travel to get to another area.  I echo around previous motifs to get to another quilting space.  You also need to know the best place to stop and plan your next quilting direction.  Stopping at any of the points in either spirals or paisleys works well to hide those start and stop places. 

When combining designs I first like to look at each motif separately. 


Paisleys are fun even by themselves.  Melissa Corry from Happy Quilting has a great echoed paisley video which helped me a lot. 


With paisleys you can make butterfly wings, hearts, vines, groupings of three or combinations in random directions.  I have drawn them out in the image above.  The asterisks is my starting place. 


Hooked spirals is one of my favorite designs.  Angela Walters has a great swirl hook video tutorial


When quilting or doodling spirals just remember to leave room to come out after you have quilted to the center. 

As I mentioned earlier, I combined the spirals with the paisleys to quilt Starburst. 


I mostly combined them in a random fashion like in the picture below.  I never counted how many spirals or paisleys I did in a row.  My goal was just to fill the space evenly with both designs.  I naturally quilted more paisleys than I did spirals. 


However, there were two combinations I especially liked. 


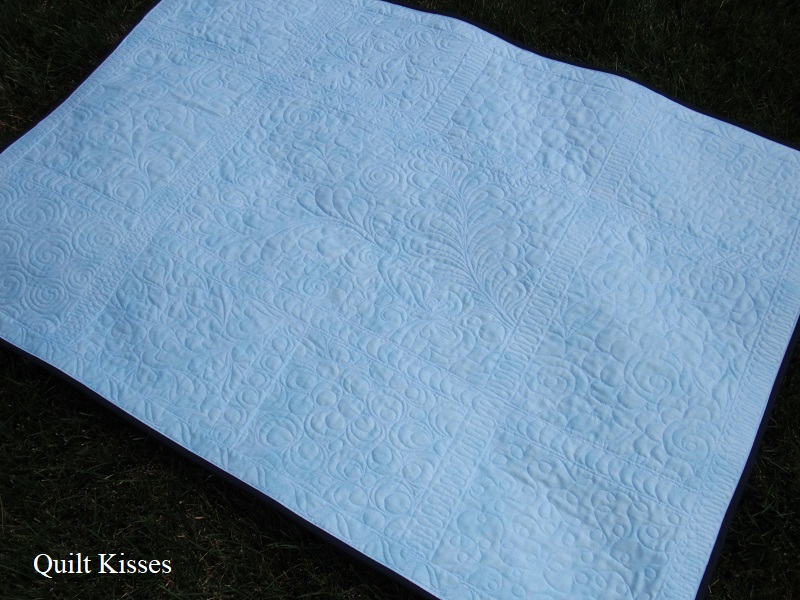
I quilted a spiral at the top of a paisley vine.  It reminded me of a flower above the leaves.  I also quilted paisleys in the same direction around a spiral.  It reminded me of feathered spirals. 

Starburst (which measures about 58 by 72 inches) was quilted in about two hours on the Bernina Q24 longarm machine.  It went quickly by leaving the designs open and echoing to move around them.  Here are a couple more pictures which show the quilting a little better. 


 I always recommend doodling designs before actually quilting them on a quilt. 


Have you ever quilted a spiral and paisley combo?  I would love to see your work if you try it or have already done it. 

XX,
Jasmine

Monday, August 13, 2018

Free-Motion Fantasy


This panel was designed by Amanda Murphy and was only available to Bernina Dealers.  She mentioned it here on her blog. I was able to purchase it from my dealer when I took a class from her with my mom. 


I had a lot of fun quilting it up on my domestic sewing machine.  It is easier for me to quilt following a line while sitting down instead of on the long arm. 

Panda doesn't like seeing the dots and arrows which tell you where to quilt. 


I told him to back up and look at the whole quilt. 


This is a quilt that does look better at a distance. 


The backing is a Riley Blake aqua from my stash.  It matched the front very well. 


The binding was leftover from one of my niece's quilts. 


I think the butterfly was my favorite part. 


I named the quilt Free-Motion Fantasy because that is the name of her newest fabric line which reminds me of the panel.


The quilt finishes about 36 x 50 inches. 

XX,
Jasmine

P.S.  I will be linking up with some of the fun parties on my sidebar.  Check them out to see what other quilters are up to. 

Monday, December 11, 2017

Christmas Week ~ Day 1


Things have been a little quiet around here.  It is not because I haven't been sewing, but rather that I have sewn so much and spent so much wonderful time with family that I haven't had computer time.  I have decided to make the time to share at least the seasonal items I have made in the last month.  I hope to share one project a day this week.  :)

This first is a very special quilt because my sister-in-law JoAnn pieced it many years ago.  She was very new to quilting  and had just joined the local quilt guild.  She made a Christmas block and entered it into their monthly drawing and won all the blocks.  They challenged her to sew them together quickly and share it at their next meeting and she did.  One of the blocks is dated 1991, so I think she pieced this 26 years ago. 


Back then she and my mom hand quilted everything (very slowly) so she never quilted this.  After she passed away it sat hidden in my mom's closet.  I saw it earlier this year and decided to finish it up.  Now, the only challenge is that my mom and I both want the quilt.  We have decided that we will rotate years who gets to host JoAnn's Christmas Tree quilt. 

I loaded this on the Bernina Q24 and debated what thread to use and how to quilt it.  I wavered back and forth between an all over quilting design and custom quilting.  Knowing that this will really only be used one month of the year, the all over quilting won out.  Call me crazy, but I actually decided to use a metallic gold thread for the quilting. 


I tested the thread out on a small practice then moved to the big, queen size quilt. (About 90 inches square.)  I thought I was going to go crazy after the fifth time the thread snapped, but then noticed that it was twisting at the beginning of the threading path.  I simply skipped the second hook at the top.  Having the thread go up and then down rather than up, across and down helped so much!  It solved my thread tangling and breaking problem.  (The bobbin thread is a golden tan thin cotton which blends with the metallic gold color.)


Needless to say I was relieved when it came off my frames. 


I raided my mom's stash for the perfect binding.  I found a dark green with tiny metallic gold flecks. 


Most of the backing came from my mom's stash as well.  It is a cute Hoffman Christmas Village print. 


It wasn't wide enough so I added a strip of dark green left over from the backing of my Autumn Race quilt.  I love how the quilt turned out and all the sweet memories it brings. 


My boys love looking at all of the different blocks.  I love the glitter from the metallic thread. 


I put it on my bed to see how it would look and couldn't bear to move it.  So it has stayed on my bed since I finished it last month. 


I'll be back tomorrow with another finished Christmas quilt. 

XX,
Jasmine

P.S.  I will be linking up with some of the fun parties on my sidebar.  Check them out for more quilty inspiration. 

Thursday, October 26, 2017

Framed Quilts Finished


It is no secret that I enjoy making quilts that are pieced simply so that I can spend more time playing with the quilting.  When I saw the "Big Square" quilt in Christina Cameli's first book, First Steps to Free Motion Quilting, I knew I wanted to make at least one.  Well, I made three and can see myself making more.  The difference is that Christina's pattern is for a "Big Square" and I like rectangular quilts.  So I altered her pattern by making the top and bottom borders bigger.  Since it was no longer a square, I started calling these my "Framed Quilts."  The center panels have some really big frames.  These quilts all finish about 40 by 50 inches.

The first quilt was made from a fat quarter of Jungle Party fabric which I saved for this quilt when making animal quilts last year.  I just couldn't bring myself to cut the cute print into four inch strips.


I quilted this on the Bernina Q24 with a spiky spiral which reminds me of claws.  I thought it was a good design for a little boy quilt.  The center panel is quilted with a medium stipple.


The quilting design was so big that it was a bit difficult to fit it around the center panel on the long arm.  It would have been easier for me on my sit down machine.


I bound the quilt in the same blue as the inner border.


It is simple, but I think it turned out really cute.


The second quilt used some cute Riley Blake princess fabric I have used on a couple other projects.  The center is actually a rectangle because I had enough fabric to make it a little bigger.


It was quilted on the Bernina Q24.  I quilted spirals in the center, loops in the inner border, and wild quilting in the border.  This improv style of machine quilting made it really easy to quilt around the framed section on a long arm machine.  I could just use a design that would fit whatever space was there.  It was so much fun to quilt like that!


Instead of a collection of closed designs (like on this table runner), I used open FMQ designs that echoed.  I quilted spirals, flowers, hearts, leaves, paisleys, and anything else I felt like in the moment.  They all played really well together.


The binding is the same blue as the inner border.


I really love this one and hope a little girl will as well.


The third quilt used part of a Snail Trail panel I bought on clearance at my LQS a few years ago.  Other parts of the panel were used in a stripe quilt I made last year.


I also quilted this one on the Bernina Q24 with wild quilting in the large solid border.


The difference is that I quilted spirals in the center of the large flowers, inspired by the flowers in the panel.


The princess quilt had a simple loop in the center of the big flowers.


I really like the spiral flower centers.


I bound the quilt in a darker green.


I didn't piece an inner border because the panel had its own wonky borders.


It is such a bright, cheerful quilt!


All three of these framed quilts will most likely be donated to Primary Children's Hospital at Christmastime this year.  The solid fabrics were purchased earlier this year when a quilt shop nearby was closing.  The solids were by Moda and Riley Blake, but I don't remember the names.

I look forward to playing with the open/echoed wild quilting designs some more.

XX,
Jasmine

P.S.  I will be linking up with some of the fun parties on my sidebar.  Check them out for more quilty inspiration.