Friday, January 17, 2014

Two Bonus Finishes


When I basted four quilts on Monday, I wondered how much I would be able to finish this week.  Surprisingly, I finished all four.  The first two, completely from my stash, I posted about here.  These two I call bonus finishes, because I did not piece the top.  I still have a few of my sister-in-law's quilt tops.  I decided to finish two of them this month, because they could use up some of my blue stash (inherited from her).  So I did the quilting and the binding on these two quilts. 


This first quilt, I call "Bit of Heaven."  I call it that because of the name of the backing fabric. 


I quilted it with a loopy line...
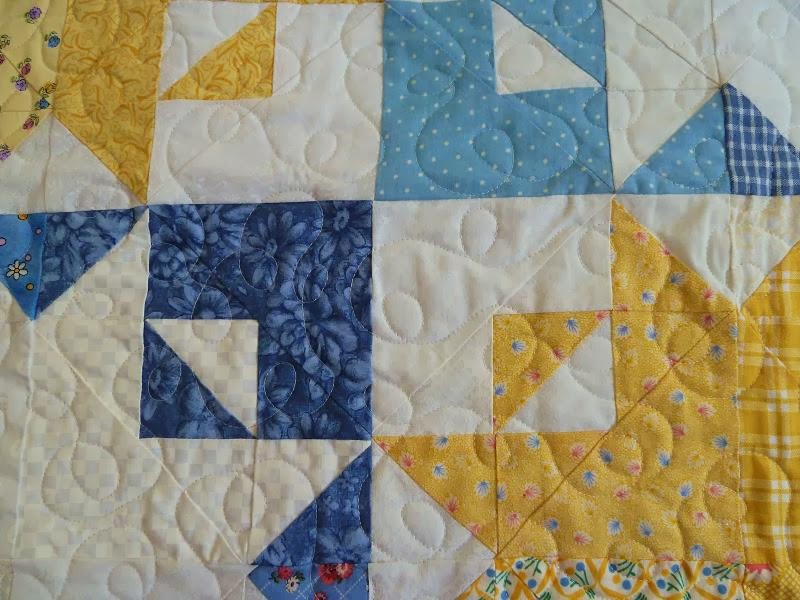

Because my sister-in-law once quilted a quilt for me like that.  I just realized that my Crazy Scrappy Star is the same pattern as "Bit of Heaven."  We took a class from Sharyn Craig together on the Northern Wind.  How interesting that she quilted mine, and I quilted hers. 


I bound this quilt in a small blue gingham print.  It really gives it a nice frame. 


Here it is again. 


It is so interesting to me how much the quilting shows in this picture. 

Quilt Stats #82
Name:  Bit of Heaven
Pattern:  Northern Wind Variation by Sharyn Craig
Pieced by:  JoAnn
Finished by:  Me :)
For:  One of her three boys
Fabric:  Backing and binding are blues from my stash
Amount used:  2.5 yards*
Batting:  Warm and White
Size:  about 36 x 36 inches
Date finished: January 2014
What I learned:
  • I like narrower bindings on smaller quilts.  (I wish I had cut it 2.25 inches wide.)
  • I love white batting for quilts with white backgrounds. 


This second quilt I call "Warm Winter Mittens,"  because that is what my sister-in-law always called it.  I know that she collected fabric for this quilt for a long time.  There are only two matching pairs. 

I just quilted in the ditch around the mittens to keep it simple.


The quilting looks neat on the back, which is a blue with cream dots.  I think it looks like it is snowing.  You can also see the hanging sleeve I sewed on in this picture.  I used the same fabric as the backing so it would blend in. 


This quilt was kept in her basement for awhile, and I know she had a problem with mice.  There was a large hole in the corner, so I added a patch which matches the backing. 


Here it is again...


My camera has a "snow" setting, and I love how the colors pop against the snow. 

Quilt Stats #83
Name:  Warm Winter Mittens
Pattern:  An old one from a LQS
Pieced by:  JoAnn
Finished by:  Me
For: One of her three boys
Fabric:  Backing and binding are blues from my stash
Amount used: 3 yards*
Batting:  Warm and Natural
Size:  about 37 x 46 inches
Date finished:  January 2014
What I learned:
  • Sometimes quilts have to be patched.
  • I like stiffer batting in wall hangings.
*I calculated the yardage for the top as the same as what I used for the back on these two quilts, because I did not piece them.  I treated it like quilting whole cloth quilts.  ;)

I am excited to have these done, and will give them to one of my nephews when I feel the time is right.  I will also be adding labels to these.  Because of the personal nature, I took pictures before sewing them on. 

I also finished another small wall hanging which I will share after someone's birthday.  ;)  So that just brings me to one work in progress.  I am excited to finish this Reverse Star quilt.  Then I will move on to another color! 


Have a great weekend!

XX,
Jasmine

P.S.  I am linking up with Finish it up Friday at Crazy Mom Quilts. 

Wednesday, January 15, 2014

Two More Blue Finishes


I finished up both of these blue stash busting quilts this week.  I am on a roll!  They are both part of my January goal for A Lovely Year of Finishes. 


The first quilt is named Winter's Joy.  I made it with 10 strips of 5 inch wide blue fabric.  Then I added a thin border of the white, cut 1.5 inches and another border of blue, cut 5 inches wide.  I like how much bigger it was with the borders, but I had to piece the back. 


I would have pieced the back anyway, because I was trying to use up my stash.  But I had to add that white strip to the side as well.  It works, but it is not my favorite. 

I quilted it with a large stipple, and did something a little different.  Normally I would have used the walking foot around the thin stop border, and then quilt the outer border separate.  This time I pretended there wasn't a border and just quilted all over.  I was worried about it while quilting it, but now that it is finished I like it. 


I also did the binding a little bit different.  I used a zig zag stitch to attach the binding to the front.  I love it on the front...


But not so much on the back...


Oh, well.  It is done.  I am not changing it, but I probably won't do it again.  All in all, I am very pleased with how this baby quilt turned out.  I will be donating it to a local charity.

Confessions Of A Fabric Addict

Edited to add on June 1, 2014: 

Because I have not found a home for this quilt, I have decided to donate it to Happy Chemo as part of the Hands2Help challenge. 


Quilt Stats #80
Name:  Winter's Joy
Pattern:  Just made from 5 inch strips and set in a diagonal pattern
Fabric:  Blues from my stash
Amount used:  5.25 yards
Batting:  Warm and White
Size:  about 47 x 56 inches
Date finished:  January 2014
What I learned:
  • I don't like the zig zag stitch on the binding.
  • I can sometimes ignore the borders when FMQ.
  • Light blues are so sweet!


The other quilt I finished is this Double Slice Layer Cake quilt.  I did do something different than the tutorial suggested.  I made both cuts on each square before piecing it.  First, I cut a couple in half...


Then I rotated my cutting mat, and cut at 3.5 inches. 


Then I stacked them all up.  I thought I was more accurate cutting this way. 


I also quilted this quilt with a large stipple. 


I used the same fabric for the binding as I did for the backing, because I had several yards of it.  It is a blue paisley.  I did bind this one by machine by sewing it to the back first, then stitching it to the top. 


I like it a lot better this way on the back. 


My husband and  I have been thinking about giving this quilt to a friend who is going through some health challenges.  I am not sure what to do, becuase I have never just given a quilt to someone (not family) before. 

**I just want to give a BIG thank you to everyone who commented.  I feel so much better about giving this quilt to our friend, and I will be adding a label saying it was made for him to bring comfort (or something else like that). 


(For some reason the beige was hard to photograph.  The color is the most accurate on the snow picture above.)

Quilt Stats #81
Name:  Seeing Double
Pattern:  Double Slice Layer Cake
Fabric:  Blues and a beige from my stash
Amount used:  8 yards
Batting:  Hobbs 80/20
Size:  about 63 x 72 inches
Date finished:  January 2014
What I learned:
  • I like cutting everything first and then sewing. 
  • I like my traditional way of machine binding a quilt better, but I prefer stitching it down by hand on the back. 
XX,
Jasmine

P.S.  I will be linking up with Let's Bee Social at Sew Fresh Quilts (my first time), Needles and Thread Thursday at My Quilt Infatuation, and Can I Get a Whoop Whoop at Confessions of a Fabric Addict. 

Monday, January 13, 2014

Ready to Quilt!

Last Saturday, I spent the day preparing backings and bindings.  Today, I spent the morning basting four quilts. 

How I baste my quilts...

I am always a little afraid to admit how I do things, thinking that the quilt police may come after me.  But I figure that I have basted and quilted more than 100 quilts and table runners this way, and it works for me.  If it isn't broke, why fix it? 

With that said, I use small T-pins to pin my backing to the floor wrong side up.  Then I lay my batting over it and use Sullivan's Basting Spray on the back of the batting one half at a time. Then I lay my quilt top over the batting.  I use the spray again.  (I only use safety pins if I have minky for the backing.)

I know some people are concerned about the over spray of the basting spray.  I am just very careful to always point the spray towards the center of the quilt.  If I push lightly on the spray then it doesn't really have much over spray.  (Plus I figure if I get my carpet a little, I can just use my big carpet cleaner.)  My husband knows I do this, and he has never complained.  :o)

It looks like this:


Then I take out the T-pins and trim the batting and backing about a half inch away from the edge of the top.  I have found that the layers do not shift much and that half inch is enough room for me.  (I have less problems with the backing flipping over and getting caught in the quilting this way.)  The first thing I will do when quilting is put on my walking foot and use a basting stitch around the edge. 

This is what it looks like after trimming:


This is my Double Slice layer cake quilt.  I added more of the beige background as a border to make the blue rectangles float.  Cheetah and I will probably call this quilt "Seeing Double."  He didn't approve of some of the other names I came up with, like "Blue Whimsy." 

I also basted this baby quilt which I added borders to.  Cheetah named this one, "Winter Joy."


Then I decided to pull out two of the quilt tops my sister-in-law made.  (She passed away nearly 8 years ago.)  I figured that I would quilt her tops this year as I am busting my stash.  That way I am using her fabrics to finish these quilts which will go to her boys when the time is right. 

The first one is this "Warm Winter Mittens" quilt. 


The second one is this Northern Wind star variation quilt. 


I wanted to add that I do not normally baste more than one quilt at a time anymore.  I find that if I machine quilt a quilt right after basting without folding it, then I get less tucks and puckers.  But I am being careful about where I lay them to prevent that.  Here they are all stacked up in my craft room on the cutting table:


And here are the bindings (and the quilt hanger for the mittens quilt) all ready to go.  I thought it was funny that I have one binding each with 4, 5, 6, and 7 strips.  The quilts are all different sizes. 


Now, my mom's machine is all set up and I am ready to get quilting.  Thanks, Deb, for the idea about this Ikea light.  ;)  I am so excited to get busy!


I wonder how many I can finish this week...

XX,
Jasmine

P.S.  Please let me know if anyone wants more pictures of my basting process. 

Thursday, January 9, 2014

Winter Quilt & Runner


I finished up the Layer Cake Lemonade quilt this week.  It is part of my January goals for A Lovely Year of Finishes.  I decided to call it Blueberry Juice.  It doesn't look like a Blue Raspberry Lemonade and who has ever heard of Blueberry Lemonade?  ;)

I quilted it with my mom's Bernina 440, because my Janome is still being serviced.  It was fun to play with the BSR, but I really missed the extra space of my larger machine.  I used two different colors of thread.  A light blue over the lights, and a grey over the darks.  The grey blended with more of the blues than any blue thread I had. 


Because the backing fabric is so splotchy with lights and darks, both colors blend in beautifully. 


I love how this quilt turned out, and see more Layer Cake Lemonade quilts in my future stash busting this year.  For more information about how I plan on using up and cutting my stash, see this post


Just so you know (but don't tell any one else...like my neighbors) I braved the falling snow in my Crocs and pajamas just to get the outdoor pictures.  I did wear a jacket, though. 


For now, this quilt will live here in my basement on this rack my awesome hubby made. 


But when I finish a different winter quilt, it may move to my sofa. 


Quilt Stats #79
Name:  Blueberry Juice
Pattern:  Layer Cake Lemonade
Fabric:  Blues from my stash
Amount used:  5 yards
Batting:  Hobbs 80/20
Size:  about 48 x 61 inches
Date Finished: January 2014
What I learned:
  • Sometimes simple patterns can pack a punch. 
  • The BSR is fun, but I like my Janome.  (Always good to appreciate your own machine.)
  • I can use my stash for fun projects. 

My other finish this week is this table runner. 


It is larger than the light blue one I finished earlier this month.  It is about 20.5 x 50 inches.  It used up nearly 3 yards of my stash fabric.  The batting was a scrap the perfect size from a lap quilt I made last year.  The backing fabric is the leftovers from the Blueberry Juice quilt. 


As you can see, I quilted it with a loosely echoed wavy line about 1.25 inches apart.  I wanted the wiggle to evolve, so I didn't use the guide bar with my walking foot.  I really like how it turned out, and so does my husband. 

The first thing Cheetah said was, "Oh. You quilted it with that squiggle again. I don't like it." Good thing it was not for him. 


Because of its larger size, it is too big for my kitchen table.  So it will live on top of my computer desk this month. 


Those three darling babies are my boys:  Cheetah, Panda and Monkey between 15-18 months old. 

Here are both projects together (with less glare on the photographs). 


I never knew blue fabric could be so much fun!  I am looking forward to finishing the other three blue quilts I started this month... Maybe I need some pillows next.  :o)

XX,
Jasmine

P.S.  I will be linking up with Finish it up Fridays at Crazy Mom Quilts and Can I Get a Whoop Whoop at Confessions of a Fabric Addict

Wednesday, January 8, 2014

Blue Stash Busting Progress

As I have mentioned, my first big goal for the year is to use up as much of my current stash as possible.  I will be breaking it down into months as part of A Lovely Year of Finishes.  My January goal is to make something[s] with my blue fabrics.  I am guessing that there are about 45-50 yards of fabric in this stack. 


I am extremely pleased with my progress so far.  I think I have come up with a system to use the stash that will work for me this whole year and beyond.  :D

The first thing I did was pull fabrics which I thought went well together. 


Then I decided to cut a half yard of each.  One 10 inch strip, one 5 inch strip, and one 2.5 inch strip.  That totals 17.5 inches, leaving plenty of room to straighten the fabric on a half yard cut.  If I didn't have a full half yard, I just cut what I could.  Or if it was slighty larger I cut more of whatever size I could, including strings between 2.25 and 1.5 inches.  (I don't want to deal with smaller than 1.5 inches.)  If it was originally a yard of fabric, then I saved the other half yard in my stack. 

I cut over sixteen yards of fabric this way, and this is what I ended up with. 


I am basically making my own pre-cuts from my stash.  I want to make simple quilts, so I think I will be visiting Missouri Star Quilt Company and the Moda Bake Shop often. 

From the light 2.5 inch strips, I made a table runner.  The left overs joined my box of pastel 2.5 inch scraps which will probably be made into a scrappy trip sometime. 


This light blue table runner is already finished.  I am loving having it on my kitchen table.  I blogged about it here.  It is about 18 x 42 inches. 

From the dark 2.5 inch strips, I made a bigger table runner (about 20 x 50 inches) for the top of my computer desk.  I also will be using some of the dark strips for scrappy bindings. 


From some of the light 5 inch strips, I made a baby quilt top.  I am thinking about adding borders to this quilt. 


From the dark and medium 5 inch strips, I will make a twin size quilt like this.  It will have 12 blocks.  It was inspired by this Rainbow Reverse Star quilt. 


From some of the ten inch strips, I made this Layer Cake Lemonade quilt top.  It is a new pattern from the Fat Quarter Shop.  I absolutely love it and will probably make more throughout the year. 


From the medium and dark ten inch strips, I may this Double Slice Layer Cake quilt top.  It is a tutorial from the Missouri Star Quilt Company.  I am thinking about adding borders to this quilt. 


After making these quilt tops, I still have between 3-4 yards of precut strips left.  I have decided to store them all together as my blue scraps.  I will leave them in strips instead of cutting them into squares, because I can then cut odd size pieces if I need them.  I will probably use them later this year with other colors.  Like a blue and yellow, or red white and blue combinations.  :) 

I am so excited about my new system.  I figure that if a quilt I am making doesn't use these sizes, then I can pull from my stash yardage or buy new fabric.  ;)

After cutting those 16 yards into strips, I still had a stack this large. 


I figure that these will still be good for borders, backings, and bindings.  Still with several yards left over.  

I feel like I am making really good progress on my goal to use up the stash--and it's only January 8th.  I feel funny going against my norm, because I usually only have 1-2 WIPs at a time.  This feels different, because they are all part of one large "project."  I have done a lot of the piecing, because my Janome (which I use for my FMQ) is being serviced.  I found out yesterday that it could still be another week!  So, my sweet mother is loaning me her Bernina 440.  I am excited to play with her BSR and get some quilting done.  I am itching to finish these. 

The only stash fabrics I am concerned about are all my florals.  They won't work in this system.


I may work on some of these next month, because I don't want to use up a lot of blenders only to need some to use these florals.  To go through a lot of them, I am thinking of a lattice quilt, a large uneven 9-patch quilt, and other simple quilts.  Also maybe some aprons, pillow cases, and bags.  What do you think? 

XX,
Jasmine

P.S.  I am linking up to WIP Wednesday at Freshly Pieced for my first time.  :-)  I am also linking up with Needles and Thread Thursday at My Quilt Infatuation.