Wednesday, April 29, 2015

Flashback: More Cabin Quilts

In my last post I shared four of the quilts my mom and I made to decorate my dad's cabin.  I still haven't had much time for quilting, so I thought I would share the last three with you today.  Once again all of the quilts here were made with flannel for the top, back, and binding.

The buzz saw quilts have a fun story...


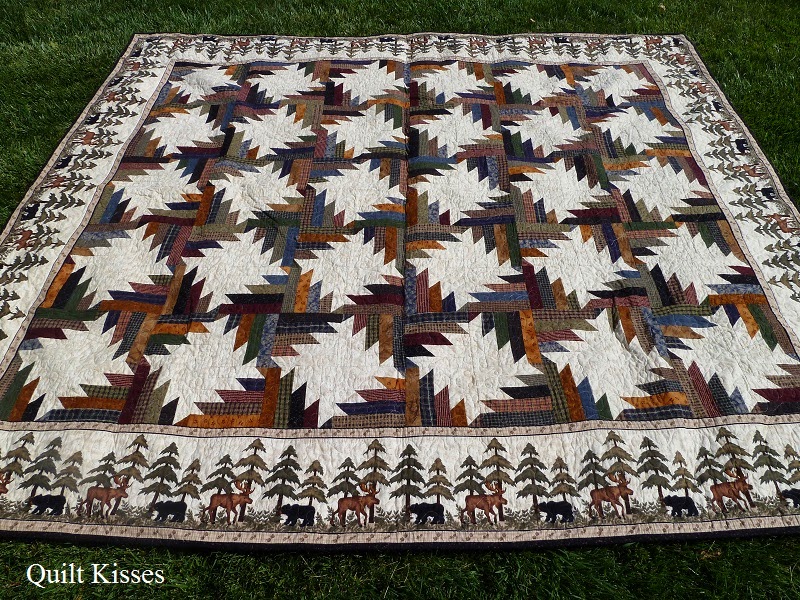
This first quilt was pieced by my mom and quilted by me on my grace frames.  It is a queen size buzz saw.  One neat thing is that the border print is also the background print.  It was printed along both selvages with the cream left in the middle.  There was exactly the right amount to make this quilt. With a quarter inch seam allowance left for each border, we could cut two 8 3/8 inch squares between them.  There wasn't even an eighth of an inch left.  Talk about cutting it close, but we made it work.  It took more yardage for the background than for the borders, so with the extra border fabric we made valances for the bedroom.

Originally this quilt was for the master bedroom in the cabin.  However, shortly after we finished it, my parents purchased a king size bed for the room.  So it got moved to the small bedroom which has just one queen size bed.

I quilted over the blocks with loops and leaves.  (You can also see a little more evidence of the mice on this quilt.)


My mom mitered the border because of the cute print, and I love  how the animals received extra limbs in the corners.  I did basic meandering in the border.


The backing is a companion print with moose and trees.


The interesting thing is after we had finished a few of the quilts, my parents decided to remodel the cabin.  It used to be done in 70's colors.  Orange, lime, and red shag carpets throughout. When they went to pick out new carpets and tile, my mom brought the finished quilts to match the flooring to the quilts.

The owner of the store, an interior decorator named Brent, fell in love with my mom's quilt and wanted to buy it from her.  She wouldn't sell it.  He then asked her to make him one, and she said she didn't have enough time.  When she told me the story, I said I could do it if he was still interested.  He definitely was, but he wanted his king size.  I met him at the quilt shop we had purchased the fabric from and he didn't find any fabric he really liked.  Turns out that the border print is what he really loved.

The problem was that we had purchased it more than a year earlier, and you couldn't get it anymore.  But the sweet owner of the quilt shop talked with her distributor, and their sales rep to see if they could do anything.  (I don't think we even thought about checking online eleven years ago.)  Turns out the sales rep remembered a small quilt shop 90 minutes away which mistakenly ordered bolts of the border fabric when it was on back order.  We contacted that small quilt shop, and they did have another bolt of the same border print and a couple more bolts in a different color way.  They were thrilled to sell us enough for another two king size quilts.  One for Brent...

My first custom quilt for someone other than my mom.
And another one for the new king size bed in the master bedroom in the blue colorway.  (I like the blue colorway better, even though the only difference is the little one inch border print.)


I pieced and quilted this one, and my mother did the handwork on the binding.  I still love how the corners look with the mitered borders.  This bear has six legs!


We put a companion print of little log cabins on the back.


That covered all six of the beds in the cabin, and I ended up making one more.  It was a really large lap quilt to keep on the sofa.


The center section is made with a pine cone panel type print.  Which I once again quilted with loops and leaves, but this time while my sewing machine was sitting in a cabinet instead of on the frames.  My mom did the handwork on the binding, so we both worked on every one of the quilts.


I quilted a fun leafy design in the borders.


The backing is a simple tan wood grain print.


I loved making these quilts with my mother.  There are so many fun memories of making them and using them at the cabin.  Hopefully, we can repair the ones the mice got to soon.


XX,
Jasmine

P.S.  I will be linking up with some of the fun parties on my sidebar.  Check them out to see what other quilters are up to.

Friday, April 24, 2015

Flashback: Mom's Cabin Quilts

Several years ago I helped my mom make seven quilts for my dad's cabin. Because I haven't had time for quilting this week, I thought it would be fun to share some of them with you.  They were all made with flannel for the top, back, and binding.  We made two log cabin quilts, two courthouse step quilts, two buzz saw quilts, and one panel quilt over a three year period (2004-2006).


This first quilt is a queen size log cabin quilt with one inch finished logs.  It is in a barn raising layout.  I pieced and quilted this one, but my mom did the handwork on the binding.


I quilted it on my Grace Machine Quilting frames with loops and leaves over the blocks and a leafy border design.  I think this is one of the first scrappy pieced backings we made.  I love how it looks.


This second quilt is a twin size log cabin.  I did the piecing and the quilting and my mom did the handwork on the binding.


This one was quilted with my Janome while it was sitting in my cabinet.  It is also quilted with loops and leaves.


This backing is also pieced.  There is cabin, bear, and moose fabric.


This third quilt is a queen size courthouse steps quilt. My mother did the piecing, I did the quilting, and she did the handwork on the binding.


It is also quilted on my grace frames with loops and leaves.


We pieced the backing to coordinate with the queen size log cabin quilt.


This fourth quilt is a twin size courthouse steps.  I pieced and quilted it, and once again my mother did the handwork on the binding.


It was quilted on my Janome while it was sitting in my cabinet.  Once again with loops and leaves.  Loops were what I quilted the best, and I enjoyed dressing them up by adding shapes.


The backing was made to match the twin size log cabin quilt.


I love seeing how different all four quilts look, yet how well they coordinate together.  These four quilts are usually on four beds in one large bedroom, but these pictures were taken in my parent's back yard.  Sadly, my family didn't go to my dad's cabin for awhile and mice broke in. When my mother and I heard that the mice were "eating" the quilts we were heartbroken.  Luckily, the damage was not nearly as bad as we imagined.  Just a few spots here and there.


I think the plan is to applique leaves or something like that over the holes.  Do you have any suggestions?

These quilts may look a little bit familiar, because I used some of the leftovers to make my husband a quilt back in 2006.


There were a lot of leftovers... like enough for another five to seven quilts.  LOL.

I will share the other three cabin quilts in another post.  So watch for it coming soon.  :)

XX,
Jasmine

P.S.  I will be linking up with some of the fun parties on my sidebar.  Check them out for lots of quilty inspiration.

Monday, April 20, 2015

Fabric Buckets Plus...


The servicing on my Tiara was done early, and I wanted to make something fun while trying out a different kind of thread (polyester embroidery thread).  So I looked through the book First Steps to Free-Motion Quilting and decided to make some quilted fabric buckets.

The first thing I did was use my Hera Marker to mark a three inch grid, then quilted each square in an organic square spiral.  It took me about 45 minutes to quilt a grid that was 12 x 42 inches - 56 continuous spirals.


I was very pleased that I did not have a single problem with the polyester embroidery thread.  I also learned that organic square spirals look better from a 3 foot plus distance.  :)  I am ready to try them out on my Magic Carpet quilt. (Once I get it basted.)

After I quilted the panel, I followed the directions in the book and made these two baskets.  One change I made was to top stitch across the pink band to fully enclose the raw edges.


That was done in the ditch above the lining.   Another change I made from the book was to just use a single fabric for the cuff instead of small scraps.


They were so much fun to make and look great in my craft room.  And while they don't look scrappy, they were made with scraps.  :)  One was made with scraps from the quilt  in my craft room (a random pink), and the other was from a scrap of Kona Bright Pink.  The pinks are so similar that I can no longer tell which one is which.  Originally I could tell just because of the different selvages.


I have a feeling that these fabric buckets may become as addicting to make as simple drawstring bags.  But I would probably need to buy some black marbled fabric to make more.  I used up the rest of my old blacks and grays cutting out a large plus quilt.  I think I am going to call it "Evening Addition."


This quilt will be donated to Happy Chemo as part of the Hands2Help Challenge at Confessions of a Fabric Addict.  I wanted to make something masculine this year.  I figured a plus quilt made from eight inch  black and gray squares would work well.  It will finish about 60 x 75 inches.  My family likes big lap quilts.

Confessions Of A Fabric Addict

There is still plenty of time if you would also like to make a quilt for the Hands2Help Challenge.

XX,
Jasmine

P.S.  I will be linking up with some of the fun parties on my sidebar including O Scrap and the Hands2Help check-in.

Thursday, April 16, 2015

Pattern Testing


I love Christina Cameli's books: First Steps to Free-Motion Quilting and Step by Step Free-Motion Quilting.   I have also been following her blog for a long time.  When she showed a quilt she was working on and asked for pattern testers, I jumped at the chance.

If I followed her pattern "Magic Carpet" exactly, this is what my quilt would look like.  I love that it looks like the squares could go on forever.


But I like to make little changes and have quilts be more rectangular.  So I extended  the columns three inches on each end.  It looked like this.  I love that the black rectangles go all the way around the quilt with big squares in the corner. I did not need to buy any extra fabric to make the change.


Then I added a black border all the way around to make the overlapping squares float.  Totally love it!  I cut out the border at 3.5 inches wide and needed 7/8 yard more of the black.


Because the pattern is called "Magic Carpet,"  I am thinking of calling it something like "Flying Carpet" or "Floating."  What do you think?

I didn't have room in the house to get a picture of the quilt oriented the right way, so I took it outside and battled the wind.


I took this close-up while it was being blown by the wind.


I waited a little bit and was able to get this picture.  While the colors are a little bit too blue, I really like it.


Starting from the center and working out, I used Kona Cerise, Valentine, Candy Pink, Violet, Magenta, Tulip, and Black.  My boys are thrilled with this new pink and purple quilt.  They are already asking who it is for.  I told them that I want to keep it in my craft room.  ;)


I am really looking forward to quilting this.  I plan on quilting each square a different design like Christina did on hers.  I will be using designs from both of her books plus some of my favorites.  But that will have to wait a little while.  My Tiara is receiving her birthday servicing right now.

Christina is planning on having the pattern ready for sale early next week.  I will add a link here once it is ready.  :) I really recommend her pattern.  It was fun, went quickly, and looks "awesome." (According to my oldest son.)

XX,
Jasmine

P.S.  I will be linking up with some of the fun parties on my sidebar.  There is something fun for every day of the week.

Friday, April 10, 2015

Dancing Daisies Progress


I have slowly but surely been working on my WISP:  Work in Slow Progress.  I am using the Dancing Daisies tutorial at the Moda Bake Shop, but hand sewing them instead.  At the beginning of the year I had enough drunkard's path sections for one block.  Now I have one fourth of them finished.  (Enough for five blocks.)


I have even started piecing the sections together to make blocks.  I realized that if you want to make progress, it helps to actually pull it out and work on it.  ;)


So I have been listening to talks given by my church leaders while piecing.  (I'm a Mormon.)  It has made me realize that I must be a kinesthetic learner.  I absorb and understand so much more while my hands are busy.

Two plus hours a week is adding up!

I just saw Angie's Dancing Daisies quilted by Kathleen.  I always planned on quilting feathers in the light section, and it is so nice seeing how it will look.

XX,
Jasmine

P.S.  I will be linking up with some of the parties on my sidebar.  There is something fun for every day of the week.

Tuesday, April 7, 2015

My New Quilted Purse


In January my friend Vicki made a darling bag from the Dainty Tote Bag Tutorial at Three Owls Handmade.  I really wanted to make one, and I have finally done it!  I absolutely love my new purse.

Except for the lining and the handles, it is entirely made from scraps.  When I made this twister quilt for my Sister-in-law, I cut out four ten inch squares from a ten inch strip.


I had a lot of scraps ten inches long by 2-3 inches wide.  I decided to cut them down to 10 x 2 inches and use them for the dainty tote bag in a checkerboard layout.  (The tutorial uses 2.5 inch squares).


Tip:  If you like strip piecing, but still want a random checkerboard layout, you can sew your background fabric (black) to your print fabric (red) then cut it down to size (2 inches).  This saves you from cutting and sewing lots of 2 inch squares.


Then you can lay them out randomly.


Because my squares finish at 1.5 inches instead of 2 inches, my bag is a bit different in size from the tutorial. However, I was still able to use her template for the side piece.  I just cut it a half inch shorter.


After piecing and cutting the outside panel, I trimmed off one row on each side so that the handles (wider than hers) would blend in with the checkerboard.


I also quilted the lining just a little bit to keep it from shifting.  Plus, I added a couple pockets.

I absolutely love my new purse!  (But I think I already said that.)  ;D

The binding around the curved edge was my least favorite part of the project. I like sewing boxed corners better.  However, I love how it looks.


Another little change I made was using a little bit longer zipper and adding a tab at the end.  This makes it open a little wider.


It fits my iPad mini and everything else nicely.


One other change I made was to lengthen the handles.  I like my purse to go over my shoulder.


While the handles may look a little odd being so long on such a small project, I really like it this way.

Just for fun, here it is in comparison with the queen bee bags I just made.


Nice and dainty!

XX,
Jasmine

P.S.  I will be linking up with some of the fun parties on my sidebar.  There is something fun for every day of the week!

P.P.S.  Originally I was going to use some of the leftover gray pieces from the twister quilt, but decided to save them for a different project.  They may become a quilted pouch sometime soon.