Monday, May 30, 2016

Ant Picnic: A Fast Finish


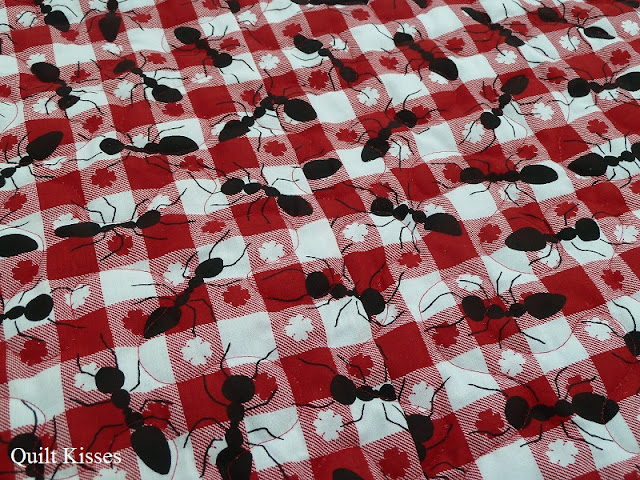
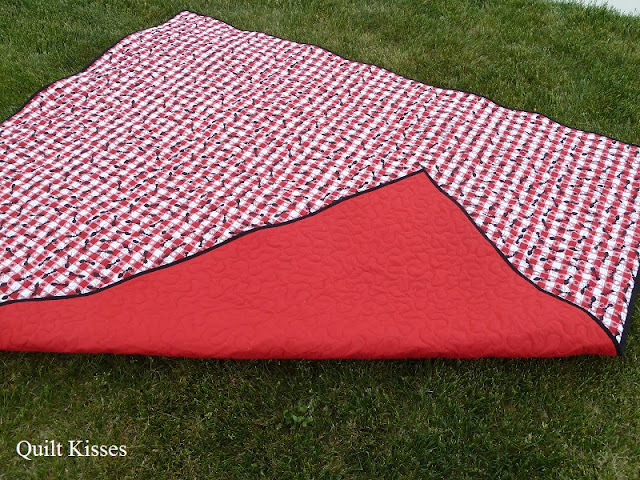
This quilt, Ant Picnic, was a fun fast finish. (Say that three times fast.)  I made it for an auction raising money for youth summer camps in my new ward at church.  It was a great stash buster because it used up all of the ant picnic fabric and all of a mystery red solid.


I had the perfect amount of fabric to make a quilt 72 x 84 inches with a pieced backing.  I just had to add some Kona Black for the binding.


I was able to match the plaid when sewing the pieces together, but I did end up with some partial ants at the seam.  I don't think anyone will notice unless they are looking for it.


I used a comfort loft polyester batting and a basting spray.  When using a polyester batting (which I usually avoid) I spray both the batting and fabric.  The double spray holds the layers together very well for machine quilting on my Tiara.  (I learned this tip from S.O.T.A.K. Handmade.)


I quilted it with a large meander.  This huge quilt only took three and a half hours to machine quilt.


I finished the quilt the day of the auction and took some pictures in my neighbor's yard while battling the wind.


Quilt Stats #181
Name:  Ant Picnic
Pattern:  Whole cloth with pieced back
Fabric: From my old stash and Kona Black
Amount Used: 9 yards
Size: About 72 x 84 inches
Batting: Comfort Loft Polyester
Date Finished: May 2016
What I learned:
  • Large meandering goes fast on my Tiara!  
As I was making the quilt I was very worried that nobody would like it or bid on it.  I was prepared to buy it back from the auction if I needed to.  However, a few different people bid on it.  The very neighbor whose yard I took the pictures in is the one who ended up with it.  I guess she also thought it would be fun for picnics by the lake.  


XX,
Jasmine

P.S.  I will be linking up with some of the fun parties on my sidebar. Check them out for more quilty inspiration.

Friday, May 27, 2016

Hands2Help

Confessions Of A Fabric Addict

This is my third year participating in the Hands2Help Challenge at Confessions of a Fabric Addict.  Unlike the first two years, I knew the Challenge would come during a crazy busy time for me.  (I have been moving and settling in my new house.)  So I decided to make my quilt earlier this year.  Things have been so busy that it has even been hard for me to make it to the post office.  However, I can now say that my quilt for Happy Chemo is in the mail.  :)


I decided to donate my Blue and Green Race Quilt.  It is a super fun and fast quilt pieced together using the Jelly Roll Race method and my calculations for different sized quilts.  Be sure to check out my original post about the quilt if you would like more information.  Here are some more pictures just for fun.


Thanks for stopping by!  What is your favorite charity to donate to?

XX,
Jasmine

P.S.  I will be linking up with the final linky party for Hands2Help. 

Monday, May 16, 2016

My New Cutting Table


My sweet husband just built me this awesome new cutting table.  I have dreamed of a cutting table like this ever since I saw Deb's from A Simple Life Quilts.  The base is two Ikea Kallax units.  The top is a melamine coated board that measures 4 feet by 6 feet.  I found the cutting mat at my LQS and it is 40 inches by 72 inches.  I am loving my new cutting table.

I thought I would share a few pictures of the process in case anyone else is interested in how he did it.
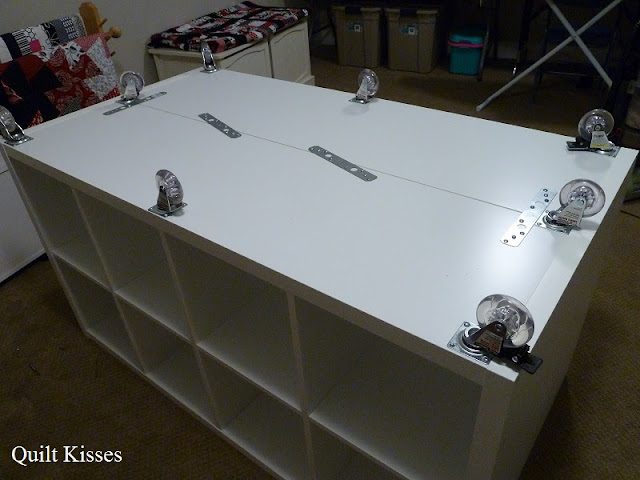
First, he put the two Kallax units together following the Ikea instructions.  I decided that I wanted them back to back, so he added some metal strips to the bottom to hold them together.  We purchased two sets of 200 pound capacity casters.  The four corner casters are locking and the four side casters are regular.


Here is the same view after we tipped the unit on its side.


We also added two straps to the inside of the top to hold it together better.


It took four of us to lift the unit onto its wheels without breaking them.  Then we added a 3/4 inch thick board coated on both sides with melamine.  He purchased the board at Lowe's and it came 4 feet by 8 feet.  I had him cut it down to 73 inches long.  To protect the melamine as much as possible, he put down painter's tape all the way around where he was going to cut it.  (Sorry I didn't take a picture of that.)


We used some of my quilting rulers to center the board over the Kallax units.  There is about a nine inch overhang all of the way around.


Then my husband added fourteen screws to attach the board.  He pre-drilled the hole for each screw.


Monkey was a great help with the drill.


We purchased some 3/4 inch melamine edging to add to the sides of the table.


It ironed on quite nicely.


I plan on adding some white caulk to clean up the edge a little bit.

Here it is filled and ready for cutting.


I love my new cutting table!  All of my fabric and projects fit on one side, but I still have more organizing to do.

What is your dream cutting table?

XX,
Jasmine

P.S.  I will be linking up with some of the fun parties on my sidebar.  Check them out for more quilty inspiration.

Friday, May 13, 2016

Monster Alphabet: A Finished Quilt


I made this cute little quilt to hang in Monkey's new bedroom.  I mostly used the Silly Gilly fabric from Henry Glass which I purchased last May.


I carefully cut out the letters and some of the monsters for this quilt.  The fabric is so sweet because each letter has a word to go with it including:  silly, teriffic, unique, valuable, and wise.  They are the kind of words you want your family to think of and remember.

The borders came from the stripe print, but I am saving the trains for another quilt.  They would have made the quilt too big for Monkey's wall.


After piecing it, I basted the quilt on my new super big cutting table.  (More on that in my next post.)  Then I quilted it on my Baby Lock Tiara.


I quilted it with a really fun swirl with arcs.  Vicki used this design on one of her quilts recently and I have been practicing drawing it.  It was just as much fun to quilt as I thought it would be.  The arcs remind me of claws.


I used a light gray thread for quilting which blends with the bright colors on the front.  You can see the quilting a little better on the backing.


The backing fabric is a Stonehenge by Northcott.  It was originally going to be pillow cases to match my Modern Farmer's Wife quilt, but I decided I liked the plain cream pillow cases better.


I quilted some of the chevrons in the first one inch border and then quilted a series of claws/arcs in the second border.

I stitched the binding to the back by hand.  I find myself binding more and more quilts by machine.  However, if there is a higher contrast between the binding and the backing fabric I like to stitch it down by hand.


I really love this quilt and can't wait to get it hanging in Monkey's room.


Quilt Stats #180
Name:  Monster Alphabet
Pattern:  Square in a Square
Fabric:  Silly Gilly for Henry Glass
Amount Used: 3.5 yards
Size:  About 40 x 47 inches
Batting:  Frankensteined Hobbs 80/20
Date Finished:  2016
What I learned:

  • I need to make more quilts so I can try out the fun FMQ designs.  Lol.
Monkey keeps telling me that he is ready for it to be hung in his room, but I still need to do that.  Hopefully it will be hanging soon.  

XX,
Jasmine

P.S.  I will be linking up with some of the fun parties on my sidebar.  Check them out for more quilty inspiration.  

Monday, May 9, 2016

Still Teaching FMQ Classes


I started teaching FMQ classes last year at my local quilt shop, and I am happy to say that I am still teaching classes there.  I teach about one beginning class every other month.  I really enjoy sharing my love of free-motion quilting with my students.  I have even had one student take my basics class twice.  The classroom is a little small, so I have anywhere from three to eight students in each class.

I took a few pictures before my students came to share here on my blog.  I demonstrate on one of the store machines, usually a Baby Lock Crescendo.  I have some quilts and table runners on display and for examples at the front of the classroom.


Then I displayed my most recent finish, a class sample, and my first FMQ project on the wall.


I tell my students to not compare their beginning to my middle.  I think it helps them to see where I started with my free-motion quilting.

I look forward to teaching more classes this year.

XX,
Jasmine

Wednesday, May 4, 2016

My Studio

I had a lot of grand ideas to get my room absolutely perfect before sharing it on my blog.  However, I realized that my room is a work in progress.  If I waited until it was exactly how I wanted it, you would be waiting a very long time.  So with that said... 


Welcome to my new craft room which I have decided to now call my studio.  ;)  The picture above is what greets you as you walk in the door.

Directly to the left as you walk in is my closet.  I have plans to hang a flannel sheet on the wall on the left for a large hidden design wall.  My closet mostly houses my scrapbook supplies and papers.  Some batting and quilts are in the back corner.  My threads and a few other quilting things are in the large Kallax/Expedit from my old craft room.


As you walk in a little further, you can see my future design wall and cutting table.  I want my design wall to look like this one at Fresh Lemons Quilts.  My cutting table is about 4 feet by 6 feet and made with two Kallax units and a melamine coated board.  My table is on wheels and is surprisingly easy to move around without slipping when I am using the table. I  will share more details about my cutting table soon.


Just past the cutting table with the quilt rack is a play area.  I have Duplos in the storage cubes for my little visitors to play with.  The quilt rack is there so they don't hit their heads on the cutting table.  There is extra sewing space on the six foot table and my Tiara is right in front of the window.


Then to the right is my old Ikea corner desk and my sewing cabinet.  There is more sewing space at the corner desk.  I hope to be able to start a small quilting group in my new neighborhood.


Continuing to the right is my ironing station.  In the future I want it to look like this one at Hyacinth Quilt Designs.


Coming full circle is my old cutting table which now serves as a computer desk.  To the side of my computer desk is another six foot table  I can set up for even more sewing space.  I estimate that I can fit six more people in here comfortably.


That door leads to the landing at the top of the stairs where we entered.


Thank you so much for stopping by and taking a tour of my new studio.


Monkey and the rest of the Quilt Kisses family hope you stop by again.


Hopefully this stack of mini quilts will be on the wall by then.
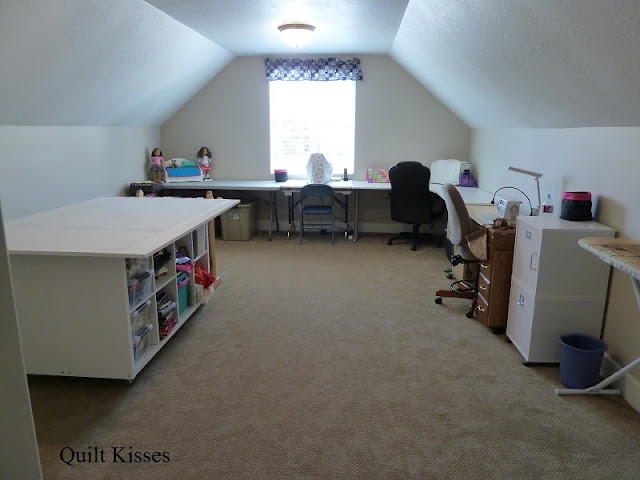

My studio is about 14.5 by 20 feet plus the closet and corner with my computer desk.  I love spending time in here.

XX,
Jasmine

P.S.  I will be linking up with some of the fun parties on my sidebar.  Check them out to see what other quilts are up to.

Monday, May 2, 2016

Dancing Daisies: A Finished Quilt


I am thrilled to say that my WISP (work in slow progress) is now finished.  It mostly uses the Dancing Daisies tutorial at the Moda Bake Shop, but I decided to hand piece it instead.  I started this quilt, made with Sandy Gervais' Chance of Flowers, nearly two years ago.


I took it many places and worked on it a little at a time.


I even took it to a conference.


After coming home from the conference, I quickly finished the top.  


I basted the quilt and started the quilting while living at my mom's house.  The quilting was inspired by this dancing daisies quilt quilted by Kathleen.


Then I finished up the quilting in my new studio after moving.  (I love the natural light with my machine in front of the window.)


I really just kept adding more and more quilting until it felt done.  Then I did the binding by hand.


I decided to call the quilt Dancing Daisies.  It is the same name as the pattern, but I have been calling it that for two years and nothing else seems to fit.


I love the texture from all of the quilting with the double batting.  The bottom layer is Hobbs 80/20 and the top is Hobbs Wool.


The backing is a cute flower print I found in the clearance section at my LQS in similar colors.


While the quilting doesn't show up as well on the back, the print does hide the mistakes.


I really love this quilt!


It will live on my foot board until I decide to display it somewhere else.


Quilt Stats #179
Name:  Dancing Daisies
Pattern: Modified Dancing Daisies Drunkard's Path
Fabric:  Sandy Gervais' Chance of Flowers
Amount Used:  7 yards
Size:  About 48 x 64 inches
Batting:  Hobbs 80/20 and Hobbs Wool
Date Finished: April 2016
What I learned:

  • Hand piecing is fun, but takes a long time.
  • The double batting gives great texture, but is very stiff.
  • A little steam around the edges can help the binding lay flatter.
  • I absolutely love playing with the FMQ.
XX,
Jasmine

P.S.  I will be linking up with some of the fun linky parties on my sidebar.  Check them out to see what other quilters are doing.