Showing posts with label Pieced Backing. Show all posts

Thursday, February 25, 2016

Blue and Green Race: A Finished Quilt


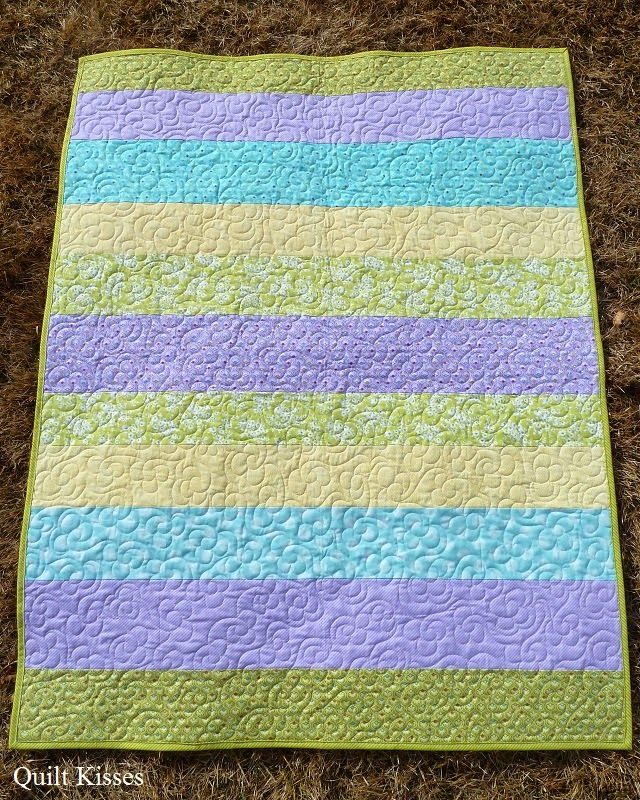
This is another stash busting quilt that I cut out last August, pieced last December, and finished this month.  I used my calculations for race quilts just like my previous quilt.


I decided to keep the strips the whole width of fabric (except for the first strip).  I think I prefer the half the width of fabric on quilts this size.  Either way, it is a fun fast quilt to make.

I quilted it on my mom's fusion and used a ruler for the first time on a long arm.


It felt very different from using a ruler on my sit down machine.  However, the more I used it, the better it looked.  I used the ruler in each section of the quilt, then went back and filled in the large spiral.


I was using a size 18 needle, and I didn't have any problems with skipping stitches.  However, the thread kept breaking if I quilted too far from the right to the left on the big spirals.  I am still learning the ins and outs of my mom's Fusion.  It is nice learning on fast quilts like this, which will be donated somewhere sometime this year.

The quilting design was inspired by one of Christina Cameli's designs in her book, Step-by-Step Free Motion Quilting.


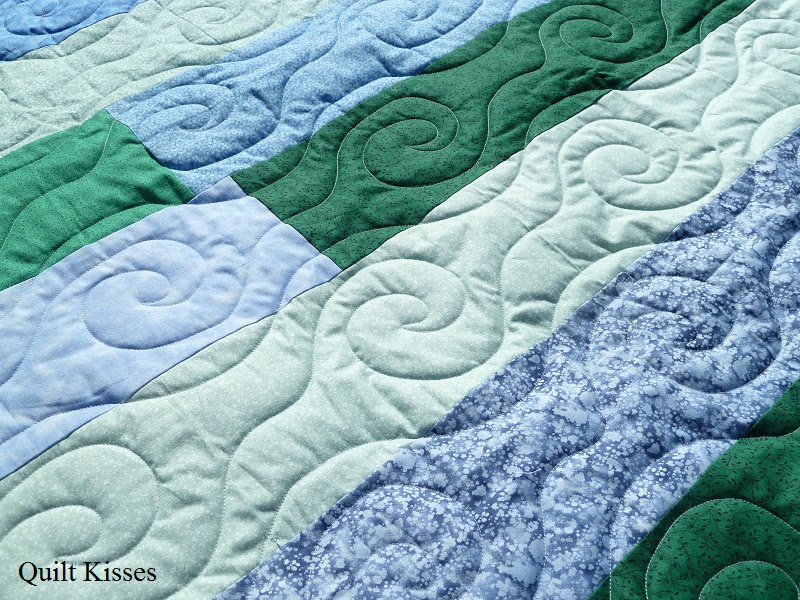
The quilting design was so large (the strips finish at 5.5 inches wide) that the quilting on this lap quilt took less than two hours.


The backing is pieced using some leftover green fabric from an old border and yardage.


That green stripe came from Milky Way, my 19th quilt, finished in 2004.


The binding on this quilt used two different blues because I didn't have enough of either one.


I really am so pleased with how this quilt turned out.


Quilt Stats #176
Name: Blue and Green Race
Pattern: Race Quilt Variation
Fabric: Blues and Greens from my old stash
Amount Used: 6 yards
Batting: Mountain Mist Polyester
Size: About 54 x 66 inches
Date Finished: February 2016
What I learned:

  • I can use a ruler on the long arm.  
XX,
Jasmine

P.S.  I will be linking up with some of the fun parties on my sidebar.  Check them out for great inspiration.  

Friday, February 19, 2016

Teal and Green Race: A Finished Quilt


This is another one of my stash busting quilts.  I actually cut out the kit for it when I was cutting out fabrics for Cheetah's Eagle Project.  I pieced the quilt top one day when I needed a break from packing.  It felt good to finish a flimsy (or two) during that crazy time.

All of these strips were cut out at 6 inches wide, but then the strips were cut in half along the fold. I used about thirty half strips, sewing them together like a jelly roll race.  However, after the first two long seams (four rows together), I cut the top in thirds so that there would be twelve rows.

I was going to try a different quilting design, but the long arm kept skipping stitches when I moved the machine away from me.  This loopy spiral seemed to work better.


After talking to some people, I believe that the machine isn't in perfect timing.  I didn't have that problem when using a size 18 needle (this was quilted with a size 16 needle).  It was suggested that when moving the machine backwards the smaller needle was pushed a little forwards by the movement causing the stitches to skip.  Even with the challenges, I still think it turned out pretty good.


I added the green to this quilt because that is what I had enough of for the backing.


I actually used a blue Aurifil thread for the needle.


And I used a green Aurifil thread for the bobbin.


The tension was good and it isn't too noticeable because they were about the same value.  (I don't like using a dark thread for one and a light thread for other.  That would be a lot more noticeable.)

The binding is scrappy using some of the teal fabrics from the top.


It really was a fun fast quilt to make.   I will also be donating this one somewhere sometime this year.  :)


Quilt Stats #175
Name: Teal and Green Race
Pattern: Race Quilt Variation
Fabric: From my old stash
Amount Used: 6 yards
Batting: Mountain Mist Polyester
Size: About 54 x 66 inches
Date Finished: February 2016
What I learned:
  • I learned more about the timing on the Fusion.  
  • I really do love fast finishing quilt.

Next, I have another stash busting quilt to share.

XX,
Jasmine

P.S.  I will be linking up with some of the fun parties on my sidebar.  Check them out to see what other quilters have been making.

Wednesday, February 17, 2016

Flannel Duo: A Finished Quilt


I am so pleased with how this quilt turned out.  It is a great stash busting quilt, using an old stack of flannel I was given years ago.  


This stack was mostly half yard cuts of fabric.  From sixteen of the fabrics I cut two eight inch strips.  One was for the front and one for the back.  Some of the half yard cuts were generous enough that I was able to cut a three inch strip for the binding.  I also cut three extra strips for the backing.

The front became a big plus quilt made from eight inch squares in sixteen different fabrics.


The backing was sewn together using my chunky race quilt calculations.  It has eighteen different fabrics.  A couple of the plaids were so big that I didn't want them on the front.


 Sixteen and a half strips were used for the main part, and then two more strips were added to the side to make the backing wider than the top.


It is important to have the backing bigger when quilting on a long arm machine.


Keeping with the stash busting, I used some old low/medium loft polyester batting which my mom had on hand.  While I don't like using polyester batting when sitting down to quilt, it wasn't too bad to use on the long arm.  I just had to be extra careful not to stretch it when I was rolling the quilt.

This process made for a fun, masculine, double sided quilt.  That is why I decided to name the quilt "Flannel Duo."  It really is as snugly as it looks and will be donated somewhere sometime this year.

I really love these big plus quilts.  I can piece one in a couple hours.


I also love the chunky race quilts.  I can piece and press one in less than two hours.


I planned it so the two sides would end up skinny.  That kept the seams all from lining up with the seams on the top and getting too thick.  I like how the stripes are vertical on the backing.

I quilted it in a loopy spiral in a light tan thread.


And used only blues for the binding.


It really was a fun, fast, stash busting quilt!


Quilt Stats #174
Name: Flannel Duo
Pattern Top: Plus quilt from eight inch squares
Pattern Back:  Race Quilt Variation
Fabric: Eighteen different flannels
Amount Used: 9 yards
Batting: Mountain Mist Polyester
Size: About 60 x 75 inches
Date Finished: January 2016
What I learned:
  • Double sided quilts are awesome!  
Next, I have more stash busting quilts to share.  

XX,
Jasmine

P.S.  I will be linking up with some of the parties on my sidebar.  Check them out to see what other quilters have been making.

Thursday, August 27, 2015

Spring Sorbet: A Finished Quilt


I had so much fun finishing this scrappy jelly roll race quilt.  I estimate that the scraps were the equivalent of 2.5 jelly rolls.  I don't know if the machine quilting, the first 55 yard seam, or remembering all the other quilts was the most fun. (Check out my previous post for more details on the piecing)  All in all, it was very enjoyable for a quilt made just for fun.  ;D

I knew I wanted to do an all over quilting pattern on this quilt.  The difficulty was in deciding which one to try, because I wanted to try something new.  I ended up choosing a large paisley quilting design.  I quilted it in a light gray Omni thread.


I started the quilting in the center then continued to work my way around the quilting multiple times switching from clockwise to counterclockwise.  I was able to quilt in that order because I have lots of room with my sit down quilting machine.  I quilted the entire full size quilt without rotating the quilt once.  I love my Tiara!  You can see how I started it in the picture below.  It is where the four paisleys meet together at a point.


I love how the quilting looks in the sunshine and how it helps blend all the strips together.  I purposely left in some slightly darker strips, because I think it adds interest to an otherwise light quilt.


I had plans for a two sided quilt which would have eight inch cut squares across the entire back, but decided to simplify the backing.  There is just a section four squares across down the length of the quilt.


There are two fabrics with four squares each and two fabrics with only one square each.  The rest all have two squares each.  My boys enjoy looking for the matches and finding the oddball fabrics.  You can see the entire backing in the picture below.


The light fabrics all came from my stash and the blue heart fabric came from my mom's stash.  The only thing I had to purchase was the binding.  I chose a fun purple dot print, because purple is my favorite color.  I first sewed it to the back, then sewed it to the front by machine.  I find myself binding more and more quilts by machine.


I was thinking of calling the quilt "Sherbet Strips" but Cheetah vetoed that name.  He came up with the name "Spring Sorbet."  He said that sorbet sounded lots better than sherbet.  Lol.


I made this quilt just for fun, and it is now hanging out in my living room.  I think it looks so pretty on my sofa.


And here is one more picture  of the whole quilt top just for fun.  You can definitely see more of the prints and less of the quilting in the shade.


Quilt Stats #145
Quilt Name: Spring Sorbet
Pattern: Race Quilt Variation 
Fabrics Used: From my stash
Amount Used: 13 yards
Size: About 80 x 96 inches
Batting: Hobbs 80/20
Date Finished: August 2015
What I Learned:

  • It is so much fun to use up scraps and see how a quilt will turn out.
  • It is more fun to sew a 55 yard seam than press a 55 yard seam.  (I like to press after each seam rather than once the entire top is sewn.)
  • I need to slow down a little with my machine quilting.  The design was so large that I found myself quilting faster than my stitch regulator could handle.  


You will probably see more of this style of quilt from me in the future.  I love the random piecing in long strips.  It is a great stash buster!

XX,
Jasmine

P.S.  I will be linking up with some of the fun parties on my sidebar.  Check them out for lots of quilty inspiration.

Wednesday, March 4, 2015

Stripe Quilts Finished


I was able to finish up the last three quilts from my mindless sewing break before the end of February which was what I was hoping for.  I have just been waiting for good weather for pictures and the time to blog.  :D  These last three quilts were all made with simple stripes.

The first quilt had softer stripes which blended more, so I decided to try a new to me all over pattern.  It is the "Cherish" design from Christina Cameli's book Step by Step Free-Motion Quilting.  (I love that book!)


I liked the cherish design so much that I decided to name the quilt "Cherish."


Out of all eight quilts I made from the fabric my friend Sherrie gave me, this is the only one without a pieced backing.


The quilting looks so cute on the back.


I used a green diagonal stripe for the binding.


It was a fun quilt to make.


Quilt Stats #132
Name:  Cherish
Pattern:  Scrappy Stripes
Fabrics Used:  Sherrie's leftovers
Amount Used: 4 yards
Batting:  Hobbs 80/20
Size:  About 42 x 54 inches
Date Finished:  February 2015
What I learned:

  • I like all over quilting designs on some stripe quilts.
  • I can quilt away from me (with the quilted portion in front of the needle).
The second quilt used fabrics with a little more contrast, so I decided to quilt each fabric/print a little differently.  


Most stripes have a loop variation, but the three largest stripes have feathers with a straight vine.  I used a Hera Marker to mark the center of the stripes as a reference point.


I was running out of girl fabric, so this one has the most creative pieced backing.


I love how the quilting looks on the backing.


I used the pink diagonal stripe for the binding.


It turned out pretty cute!


Quilt Stats #133
Quilt Name:  Sweet Stripes
Pattern:  Scrappy Stripes
Fabrics Used:  Sherrie's leftovers
Amount Used:  4 yards
Batting:  Hobbs 80/20
Size:  About 42 x 54 inches
Date Finished:  February 2015
What I learned:

  • Sometimes quilting ideas don't come until you are sitting down with the quilt under the needle.
  • Simple quilting is so much fun!
The last quilt was made with primary colors and black.  I think it looks boyish, but one of the blacks has hearts.  My husband thinks it should be for a girl.  


It was quilted with just wiggly lines.  I used the Hera Marker to divide each of the stripes (except red) in half.  On the black the wiggles move in the same direction.  On the blue the wiggles mirror each other.  On the yellow the wiggles were random.  And on the red, the wiggles created a ribbon.


The stripes were different widths, so the wiggles are different heights.  They still look cute on the back.


Wiggles are very forgiving.


The binding used the leftovers of both of the blacks in the quilt.


I love wiggles!


Quilt Stats #134
Quilt Name:  Primary Stripes
Pattern:  Scrappy Stripes
Fabrics Used:  Sherrie's leftovers
Amount Used: 4 yards
Batting:  Hobbs 80/20
Size:  About 42 x 54 inches
Date Finished:  February 2015
What I learned:

  • Wiggle quilting is fast.
  • The ribbon quilting on the red was easier than I thought it would be.


These three quilts have been added to the stack in my craft room.  I will use them as examples in my Free Motion Quilting Basics classes until I donate them somewhere.  :)


It feels good to be back to a normal amount (2-3) of WIPs for me.

XX,
Jasmine

P.S.  I will be linking up with some of the fun parties on my sidebar.  Check them out to see what other people are up to.  Plus I am linking up with Free Motion Mavericks for the first time.