Wednesday, September 30, 2015

Escaped: A Finished Quilt


I have made quilts for many different reasons, but I have never made a quilt just to be able to give it a specific name (until now).  This quilt is called, "Escaped" because some of the bugs have escaped the jars.

This quilt was inspired by a comment Yvonne made on my last post about the quilt, "Caught."  I had jokingly said that if I quilted a bug in the grass that I could have called it "Escaped."  She thought I should make another version and call it "Escaped."  Other people agreed with her.  I couldn't stop thinking about it, so in less than two days I had another quilt finished.  My second quilt finish for the month of September.

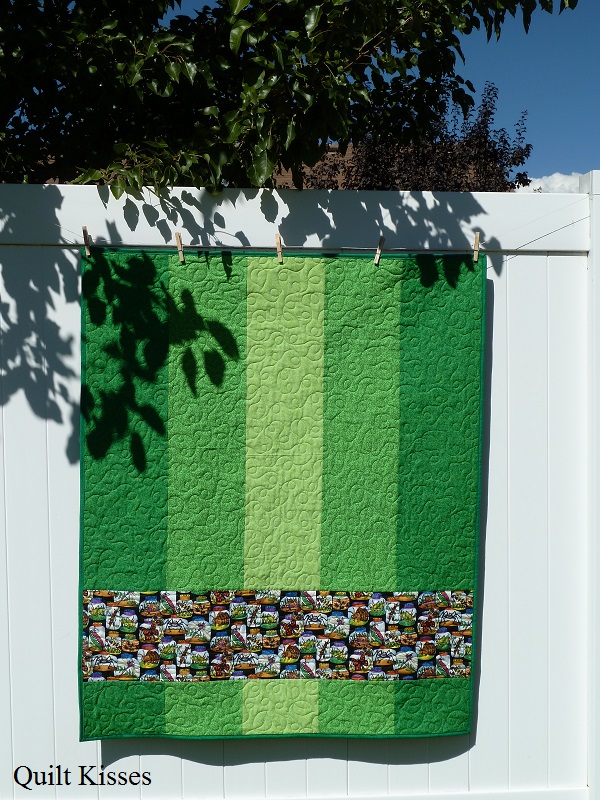
I didn't have enough greens to use the same pattern, so I decided to make a stripe quilt instead.  I hunted through my leftover fabrics and came up with this quilt.  

Christina Cameli recommends following a pattern with small, medium, and large stripes on a stripe quilt.  I followed her advice and kept the yellow and green as medium stripes, cut 4.5 inches wide.  The blue stripes are small, cut 2.5 inches wide.  The bugs are the large, cut 6.5 and 8.5 inches.  The quilt ended up being 41 by 48 inches, great for a baby quilt.


Everything is a leftover.  The jars were left over from "Caught."  The other bug print was left over from my boys' bug jar quilts.  The blue was left over from Panda's "Beary Blue."  The yellow and green were left over from "Happy Haunting."


The light green on the back and the dark green binding were left over from "Caught."  The other two backing fabrics were left over from Monkey's "Things That Go."  Does that make this a scrap quilt?  Or is a quarter yard too large to be considered a scrap?

I quilted this quilt on my domestic sewing machine because it was already set up after quilting "Caught."  I kept the medium green in the bobbin for the whole quilt, but used medium green, medium blue, and medium gray in the needle.  I have found that as long as the value is the same in my needle and bobbin threads I can mix up the colors a bit.


I quilted a stretchy meander with green thread over the bug jars.  (That's the same way I quilted it on "Caught.")  I quilted a wiggly line in blue thread on the blue stripes.


I quilted a regular meander with gray thread over the free bugs.


I quilted loops and one escaped bug in green on each of the yellow and green stripes.


It was so much fun, and I love how the whole quilt turned out.


The quilting gives this quilt such great texture.


And the darker green binding gives it a great frame.


Here is "Escaped" with its inspiration "Caught."  They are almost the same size.  "Caught" is just three inches longer.


Quilt Stats #167
Name: Escaped
Pattern: 2, 4, 6, and 8 inch Stripes
Fabric: Leftovers from other projects
Amount Used: 3.5 yards
Batting: Hobbs 80/20
Size: About 41 x 48 inches
Date Finished: September 2015
What I learned:

  • Sometimes you just have to get to work when the inspiration strikes.  

I don't have plans for either of these quilts yet.  They are just going into the gift/donate pile until I make a decision.  But at least a finished quilt (or two) is better than fabric on the shelf, right?  


Now that it is finished, I can get back to making a quilt for my oldest brother.

XX,
Jasmine

P.S.  I will be linking up with some of the fun parties on my sidebar.  Check them out for lots of inspiring quilty projects.

Tuesday, September 29, 2015

Caught: A Finished Quilt


September was a crazy busy month with soccer, colds, and helping Cheetah.  So I am extra happy to have finished this quilt.  It is my only quilt finish for the month of September.  I used it for demonstrating in my MORE Free-Motion Quilting Class, so I decided to finish quilting it on my domestic sewing machine.


Because I teach others to quilt on their domestic sewing machine, I find it very helpful to occasionally quilt with mine.  I remembered that even if I quilt at this machine's top speed, my hands are still moving fairly slow.  :)

Taking inspiration from the green fabrics in this quilt, I quilted with loops and leaves across the green sections.


I quilted a stretchy meander across the bug jar stripe to keep the quilting more simple.  I stitched in the ditch between the green and the jars.


I used a slightly darker green for the binding to continue the ombre look.


I cut the three center stripes at 8.5 inches and the outer stripes at 9.25 inches to maximize the width of the quilt.  The bugs were cut out at 10 inches.


It is the second time I have used this pattern for a simple baby quilt.  The first was the "April Showers Bring May Flowers" quilt.


Kind of fun seeing the same pattern in boy and girl colors.

The back of the quilt is more of the bug jar fabric.


I decided to name the quilt "Caught" because all of the bugs have been caught, and none can be found in the green grass.


If I thought ahead, I would have quilted one bug in the grass and called it "Escaped" instead.  Lol.

**I decided to make another quilt and call it "Escaped."  Check out this post for more details.  

Quilt Stats #166
Quilt Name:  Caught
Pattern:  Simple quarter yard stripes
Fabric:  Greens and bug jar from my stash
Amount Used: 3.5 yards
Batting: Hobbs 80/20
Size:  About 41 x 50 inches
Date Finished: September 2015
What I Learned:

  • Quilting on my small domestic machine is still fun!
XX,
Jasmine

P.S.  I will be linking up with some of the fun parties on my sidebar.  Check them out for lots of quilty inspiration.

Tuesday, September 22, 2015

Teaching More Free-Motion Quilting


A lot of my normal quilting time last week was spent preparing a handout and sample for my first time teaching my second free-motion quilting class at my LQS.  My first class is called "Free-Motion Quilting Basics" and I have taught it five times this year.  This second class is called "MORE Free-Motion Quilting."  Both classes are for beginners, but cover different aspects of free-motion quilting.

My first class covers the basics and background knowledge including batting, threads, needles, marking supplies, basting, tension, etc.  We practice on samples the size of a fat quarter.  My second class covers choosing designs, testing out designs, practicing designs, warming up on sample sandwiches, and quilting a simple baby quilt.

I really loved teaching this class because I was able to show them that machine quilting is about more than just holding the quilt together.  I brought in some of the quilts I finished in February and was able to show them how different quilting designs can change the look of the same quilt.


They loved learning to test out designs (like with clear vinyl) before starting to quilt.


I think they found it helpful to watch me quilt on the sample I brought to class as I talked them through my thought process.  I discussed where I start quilting, my plans for filling in the design, how I grip the quilt, how I keep track of where I have already quilted, dealing with thread breaks, quilting at the edge of the quilt, and more.


I am so pleased with how this class turned out and I look forward to teaching it again in the future.  I believe my students found this class very helpful.

XX,
Jasmine

Tuesday, September 15, 2015

My Niece's Fourth Quilt


I recently helped my niece S finish her fourth quilt.  (The other quilts I helped her with can be found here and here.)  I love how it turned out.

She has decided that she loves to make a quilt when she is visiting Utah, and I love helping her.  She looked through pictures of quilts I have made in the past and fell in love with the Layer Cake Lemonade pattern from the Fat Quarter Shop.  We made it bigger by adding to the bottom and side.  When I knew she wanted to make the quilt in teals, blues, and purples I offered for her to come shopping in my stash for her birthday.

We had fun cutting it out and determining a layout on my design wall.  We labeled all the pieces with Post-it notes and she took it to my mother-in-law's to piece.  Once the top was finished I helped her with the backing and I quilted it on my mom's Fusion.  She helps me when it is time to roll the quilt.  

She selected a breeze pantograph which came with my mom's machine and quilted it in a blue Aurifil 50 weight thread.


She really has such a good eye for color.  The blue thread she chose blended beautifully with the teals, blues, and purples.  Plus, it looks really neat on the solid black backing.


We were really short on time, so I took it back to my house and added the binding.  A nice teal solid which she selected.


I finished it the day before she flew home and quickly took pictures in my back yard.


My sweet niece has already given this quilt to a friend of the family who is 95 years old.  I know the recipient treasures this quilt and appreciates all the work that went into making it.

Also before she left, she bought a kit for another quilt.  It came in 5 inch cut squares.  She said that it will be an incentive to learn how to use her own sewing machine back home.  I am sure her fifth quilt will be coming soon.  ;)

Can you tell I am such a proud aunt?

XX,
Jasmine

P.S.  I will be linking up with some of the fun parties on my sidebar.  Check them out for lots of quilty inspiration.

Friday, September 11, 2015

Charming Stripes Quilt Tutorial

Baby Quilt Tutorial

I recently made thirteen quilt tops using this simple design, and thought that others might like to see my method for making them.

20 quilt tops donated for Cheetah's Eagle Scout Project.  13 use the tube method in this tutorial.

I used the tube method which I learned when making my Colorsplash Trip Quilt in 2007. It is also the method used by Bonnie Hunter with her Scrappy Trips Quilt.   If you are already family with the tube method, be sure to check out step 10.  That is what I learned to do to make sure I unpick the correct seam.


For this simple baby quilt top you will need:

  • 10 fabrics in sixth yard cuts ~or~ 5 fabrics in third yard cuts
  • Half yard fabric for the border
This tutorial was an afterthought, so I don't have pictures for every step.  However, I hope you still find this helpful.  :)

Step 1:  Cut ten 5 inch strips by the width of the fabric.  Cut five 3 inch strips from your border fabric, set those aside for now.  

Step 2:  Lay the 5 inch strips out in the order preferred.

Step 3:  Sew all ten strips together so they line up on one side.  Do not press any seams as you sew them together.  


Step 4:  Press seams toward the even rows, but do not press the seam between rows 5 and 6.

Note:  I pinned Post-it notes to the even rows with arrows showing pressing directions.


This is what it will look like on the back after the strips are pressed.


Step 5:  Fold the strip set in half and sew row 10 to row 1 making a tube.


Optional:  Press seam between rows 5/6 and 10/1 flat.

Step 6:  Lay the tube on your cutting mat and cut off the selvages on the side where they line up.  (I walk to the opposite side of my cutting table to do this.)  My 24 inch Omnigrip ruler was perfect for this tube.


Step 7:  Cut four 5 inch strips/columns.


Note:  I like to line up the horizontal lines/dots with the edges of the strips as I cut to make sure it stays square.


Step 8:  After cutting four columns, slide the strip set over on the cutting mat and square up the edge again.  (Once again I square up the edges from the opposite side of my cutting table.)


Note:  It is very important to keep the columns square or they will bow once unpicked.

Step 9:  Cut four more 5 inch columns for a total of eight columns.

Step 10:  Turn your tube columns right side out and determine a layout.  You will only see half of the quilt top at this point because they are all in tubes.  **I find this step extremely helpful because it can be so easy to unpick the wrong side of a square when the columns are in tubes.**


Note:  If you are only using  two each of five different fabrics, place a pin in row 1 of your original strip set after cutting the columns.  I learned the hard way that one of each fabric will end up in an even row, and one of each fabric will be in an odd row.


Then when you lay out the tubes make sure the pinned squares are in a diagonal row.  This will keep your seams nesting together nicely.  


Step 11:  Unpick the top seam from the layout in step 10.


Optional:  After unpicking quickly press the seams in each column so they are pointing towards the even rows (especially between rows 5/6 and 10/1).  Also press the top and bottom of each column where the tube was unpicked.

Step 12:  Line up each column on the design wall to double check the layout.


Note:  I like to use numbered flower pins which I leave in the top square of each column to keep the columns in order as I sew them together.


Step 13:  Sew columns together in pairs.  The seams should all nest as you are going.  I did not even pin and still achieved great points.


I pressed the seams toward the bigger column number (the right in this picture)


Step 14:  Continue sewing the columns together and pressing to complete the center portion of the quilt top.


Step 15: Take three of your 3 inch border strips (from step 1), cut off the selvages, and sew them end to end to form one long strip.  (The sides of your center section should measure about 45.5 inches, so one width of fabric strip will not be long enough for your side borders.)

Step 16:  Add your side borders.  Both of the side borders will come from the long strip sewn together in step 15.  Remember to measure your center section and cut the border strips to the correct size.  Pin the borders, sew, and press toward the border.


Step 17:  Add your top borders in similar manner using the other two 3 inch strips from step 1.  Remember to measure your quilt top and cut to the correct size.


Now you have a completed quilt top which will measure about 41.5 by 50.5 inches.  I love this method for sewing them together and love how all of the seams nest together.  This is what the back of the quilt top looks like.


And just for fun, here is the quilt top with light shining through.  I love the stained glass look.


Note:  I do think that a wider border looks better with the 4.5 inch finished squares, but I chose 3 inch cut borders because I could just use the width of the fabric for the backing.  I made a similar quilt with two borders last year.


It was a little larger and required me to piece the back.  (Not the prettiest backing because I was just using up stash fabrics.)


I named this design "Charming Stripes" because the diagonal stripes are made with 5 inch squares.  Please let me know if you have any questions.

XX,
Jasmine

P.S.  I will be linking up with some of the fun parties on my sidebar.  Check them out to see what other quilters are doing.