Friday, March 13, 2015

Forest Friends: A Finished Quilt


My husband's birthday quilt is now finished.  :) Only a day after his birthday.  But that's okay.  I got it quilted in the morning yesterday, and then was able to fix him a nice home cooked meal and have family time.  I finished up the binding and hanging tabs this morning.  4 days start to finish isn't bad.

As I mentioned in the previous post, I debated about quilting an all over design or a custom design.  I decided to ask the birthday boy, and he chose the all over design.  I guess he likes simple quilts too.


When quilting over the animals, I just tried not to quilt over their faces.  I really like the way it turned out.

The animals are cut out from a Robert Kaufman Pine Ridge panel, and the block borders are a few fabrics my husband picked out as well as scraps from his Christmas quilt.  The backing is a companion print from the Pine Ridge line.


Because the quilt finishes about 40 x 50 inches, I didn't have to piece the backing.


You can see the corners and tabs on the top for hanging the quilt.  My husband was very specific on how he wanted to hang it.  The corners will keep the rod from sliding out, and the tabs will keep it on the rod.


He found some hooks which fit this rod perfectly and will mount with screws flush to the wall.

When I make tabs or a hanging sleeve like this, I stitch the bottom down with some give at the top (about a half inch)


That helps the quilt not to "roll" over the rod and it hangs straighter.  We used four of these hooks to hang it up.


And here is where it will live.


Knowing it will be displayed on a wall with wood paneling, I decided to bind it in green.  (His favorite color.)  It is the same plaid from the top of the quilt, but cut on the bias.  I love plaids on the bias.


I added my favorite corner label to finish it.


Cheetah helped me name the quilt "Forest Friends."  He didn't like my original name, "Wildlife."  He can be such a sweet critic.  ;)


Quilt Stats #136
Name:  Forest Friends
Pattern:  Square in a Square (blocks finish at ten inches, and borders are 1.25 inches finished)
Fabrics Used:  Pine Ridge and scraps
Amount Used: 5 yards
Batting: Hobbs 80/20
Size:  About 40 x 50 inches
Date Finished: March 2015
What I learned:

  • It helps to take a break from arranging things on the design wall.  
  • Fussy cutting uses up a lot more fabric.  
  • My dad loves this quilt.  He wants one just like it but big enough to cuddle in.  
Until he hangs this quilt up, I will be enjoying it on my sofa.  


My husband received his big present (something for playing in the great outdoors) early, and his quilt a day late.  At least he was able to open a gift from Jennifer on his birthday.


He loves the green, ducks, and hunting dogs.  Thanks so much Jennifer!

XX,
Jasmine

P.S.  I will be linking up with some of the fun parties on my sidebar.  Check them out to see what other quilters are doing.

Wednesday, March 11, 2015

An Outdoorsy Flimsy Finish


I am happy to say that my husband's quilt is now a flimsy.  It helped so much to step away and not look at it for several hours.  Something I need to remind myself when I keep rearranging things on the design wall.  I appreciate everyone else's perspective and interest in my new quilt project.

So this is what it looked like yesterday.


And this is what it now looks like.


While I didn't change anything, I love how much better a finished quilt top looks.  I hope to get this quilted tomorrow (hubby's birthday).  

I am most likely going to do an all over pattern.


I like simple quilting designs.

But part of me is maybe thinking about quilting each part separately.


The all over design is winning right now.  If I don't quilt this quilt the second way, then I'm sure to try it on another quilt sometime.    My dad now wants a quilt just like this, but big enough to cuddle in.

XX,
Jasmine

P.S.  I will be linking up with some of the fun parties on my sidebar.  Check them out to see what other quilters are doing.  There is something fun for every day of the week.

Tuesday, March 10, 2015

Square in a Square Quilt in Progress


My sweet husband has been asking for another quilt.  Because it is his birthday this week, I figured I should start working on it. He wanted a large outdoorsy wall hanging.  So we went together and picked out some fabric.  He really liked this "Pine Ridge" panel made by Robert Kaufman, so I decided to make him a square in a square quilt.

He helped me select some other fabrics to go with it.  I love the wood grain print.


The top print is also from the "Pine Ridge" fabric line, and it will be my backing.  The green plaid will be in the quilt top as well as my binding.  Making it up as I went along, I decided to use some of the scraps from his Christmas quilt, Bear Tracks, to add some variety.


Luckily, the fabrics went together very well.

I figured out that I could cut the large animals out in an 8 inch square and the smaller pictures in a 5.5 inch square.  Adding 1 or 2 borders of 1.25 inches (1.75 inches cut) would make the blocks finish at 10 inches.  I was happy that it worked out so well.  20 finished blocks will give me a quilt that is 40 by 50 inches.  The perfect size for where he wants to hang it.


I was even happier when I started cutting and laying things out on my design wall.  I don't have to go and purchase any more fabric.  :)


What do you think?  I think I have been looking at it too long.

XX,
Jasmine

P.S.  I will be linking up with some of the fun parties on my sidebar.  There is something fun for every day of the week.

Friday, March 6, 2015

Handi Quilter University


This has been a fantastic week!  My husband stayed home to take care of the boys and I went with my mother to the Handi Quilter University Pro-Stitcher classes.  While I have a sit down quilting machine, my mother has a Handi Quilter Fusion (24 inch) with the Pro-Stitcher (computerized quilting program).  She wanted to learn how to use it and have me go with her.  Handi Quilter is located just outside Salt Lake City, Utah so we didn't have far to go.

On the first day we got to tour the facility.  The machines are manufactured right there.


They moved last July.  So while my Tiara was not built there, it was fun to see where other Tiaras are built.


I learned that Handi Quilter sells more quilting machines than any other brand.  During busy times they can make up to 60 machines a day.

Then we learned about quilting edge to edge designs.


You select an area, program everything, and it does the quilting.  Pretty cool.  (But I did miss the free-motion.)  The second day we learned about blocks, and the third day borders.


I loved taking the class with my mother.  Our machines were side by side.


It was lots of fun, and I look forward to playing with her machine in the future.  My mom is not interested in learning free motion quilting, so this class was perfect for her to use what she has.

Another great part was seeing all of the inspiring quilts.  Here are a couple of my favorites.


While some of the quilts were labeled with names and quilter, not all of them were.  But I can tell you that these were made by Handi Quilter employees.

The classes were great (I highly recommend them), but one of the best parts was getting to know other quilters from across the United States.  I believe we were their biggest group ever.  (One person had to leave before we took this photo.)


The Handi Quilter University included all of our meals, and we all stayed at the same hotel.  So we spent a lot of time together.  By the time we returned to our room, I was exhausted!

Besides my new understanding of my mom's machine, this is what I came home with.


I took the four edge to edge designs and turned them into a simple tote bag.


It is completely reversible.


I wasn't able to finish everything on the sampler quilt in the class.


So I traced the tulips onto gold paper, and quilted them on my machine.


I added a little more quilting and then a binding.  Now it is finished.


Here is my favorite block.


Quilt Stats #135
Name:  Pro-Stitcher Sampler
Pattern:  Class Kit from Handi Quilter
Fabric:  Pink solid and stripe
Amount Used 2.25 yards
Batting:  Hobbs 80/20
Size:  32 x 32 inches
Date:  March 2015
What I learned:

  • How to use the Pro-Stitcher.
  • The Pro-Stitcher is pretty neat.  
Handi Quilter University has three different courses.  Two are for free-motion quilting, and then this computerized class.  The educators were fantastic, and I highly recommend their courses to anyone who owns a Handi Quilter.  

XX,
Jasmine

Wednesday, March 4, 2015

Stripe Quilts Finished


I was able to finish up the last three quilts from my mindless sewing break before the end of February which was what I was hoping for.  I have just been waiting for good weather for pictures and the time to blog.  :D  These last three quilts were all made with simple stripes.

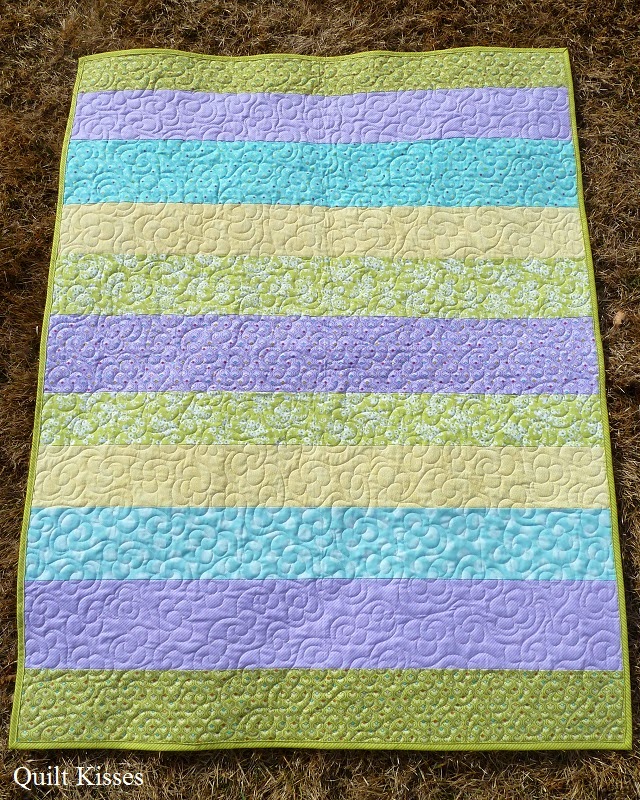
The first quilt had softer stripes which blended more, so I decided to try a new to me all over pattern.  It is the "Cherish" design from Christina Cameli's book Step by Step Free-Motion Quilting.  (I love that book!)


I liked the cherish design so much that I decided to name the quilt "Cherish."


Out of all eight quilts I made from the fabric my friend Sherrie gave me, this is the only one without a pieced backing.


The quilting looks so cute on the back.


I used a green diagonal stripe for the binding.


It was a fun quilt to make.


Quilt Stats #132
Name:  Cherish
Pattern:  Scrappy Stripes
Fabrics Used:  Sherrie's leftovers
Amount Used: 4 yards
Batting:  Hobbs 80/20
Size:  About 42 x 54 inches
Date Finished:  February 2015
What I learned:

  • I like all over quilting designs on some stripe quilts.
  • I can quilt away from me (with the quilted portion in front of the needle).
The second quilt used fabrics with a little more contrast, so I decided to quilt each fabric/print a little differently.  


Most stripes have a loop variation, but the three largest stripes have feathers with a straight vine.  I used a Hera Marker to mark the center of the stripes as a reference point.


I was running out of girl fabric, so this one has the most creative pieced backing.


I love how the quilting looks on the backing.


I used the pink diagonal stripe for the binding.


It turned out pretty cute!


Quilt Stats #133
Quilt Name:  Sweet Stripes
Pattern:  Scrappy Stripes
Fabrics Used:  Sherrie's leftovers
Amount Used:  4 yards
Batting:  Hobbs 80/20
Size:  About 42 x 54 inches
Date Finished:  February 2015
What I learned:

  • Sometimes quilting ideas don't come until you are sitting down with the quilt under the needle.
  • Simple quilting is so much fun!
The last quilt was made with primary colors and black.  I think it looks boyish, but one of the blacks has hearts.  My husband thinks it should be for a girl.  


It was quilted with just wiggly lines.  I used the Hera Marker to divide each of the stripes (except red) in half.  On the black the wiggles move in the same direction.  On the blue the wiggles mirror each other.  On the yellow the wiggles were random.  And on the red, the wiggles created a ribbon.


The stripes were different widths, so the wiggles are different heights.  They still look cute on the back.


Wiggles are very forgiving.


The binding used the leftovers of both of the blacks in the quilt.


I love wiggles!


Quilt Stats #134
Quilt Name:  Primary Stripes
Pattern:  Scrappy Stripes
Fabrics Used:  Sherrie's leftovers
Amount Used: 4 yards
Batting:  Hobbs 80/20
Size:  About 42 x 54 inches
Date Finished:  February 2015
What I learned:

  • Wiggle quilting is fast.
  • The ribbon quilting on the red was easier than I thought it would be.


These three quilts have been added to the stack in my craft room.  I will use them as examples in my Free Motion Quilting Basics classes until I donate them somewhere.  :)


It feels good to be back to a normal amount (2-3) of WIPs for me.

XX,
Jasmine

P.S.  I will be linking up with some of the fun parties on my sidebar.  Check them out to see what other people are up to.  Plus I am linking up with Free Motion Mavericks for the first time.