Monday, March 21, 2016

Fixing a Custom Quilt


Believe it or not, but four years ago I was afraid of minky.  It was all because of this quilt.  This was pieced by Tammy, my mom's friend, and quilted by me.  You see, I used the knowledge and experience that I had and finished the edges of this quilt with the envelope method.  I had simply quilted some minky applique quilts for my mom and we had used the envelope method successfully.  However, when I quilted this one with more derail there was a big tuck on the back.


Minky does not hide tucks. at. all.  Luckily, Tammy loved how it turned out and never complained about my mistake.  I have learned a lot about minky in the last four years and have luckily moved past my fear of minky.  Yet, I felt sick inside every time I thought about this quilt.

Well, last month Tammy contacted me again.  She asked me to quilt another quilt for her second grandchild and wanted me to repair this quilt.  It is loved and used every day, causing some of the fabric and batting to wear through.  We discussed how I felt about my original mistake and she told me to not worry about it again because this quilt is so loved.  I feel so much better now and happily repaired this quilt.


This is Tammy's granddaughter's favorite corner.


The first thing I did was cut off the original edging.


Then I added a patch of batting and whip stitched it into place.


I cut a new stripe of giraffe fabric for each end and added it on top with my walking foot.


After folding the giraffe fabric over, I just quilted over the top through all the layers.


There is extra quilting which shows on the back, but it really blends in.


Then we added a traditional binding like I now do on all of my minky backed quilts.


The orange binding adds so much to the overall look of the quilt, and here is the favorite corner.


I made all of the repairs in one morning so her granddaughter wouldn't be without her quilt for one night.  While she can't find her favorite corner anymore, she is happy to have her quilt back and still sleeps with it every night.

XX,
Jasmine

Thursday, March 17, 2016

My WISP Flimsy


I kept working on my WISP (work in slow progress) and got all of the blocks finished.  Then I laid them out on the floor and marked each block with a butterfly pin.


I loved how I could write a letter an number on each of the butterfly pins.  Then I purchased a new Clover Mini Iron II and pressed each of the blocks.  By sewing only on the drawn seam lines, I was able to swirl each of the intersecting points in the block.  (See my piecing method here.)


Pressing made a big difference in the looks of the blocks!


I debated about sewing the sixteen inch blocks into a quilt top by hand or machine, because I was not looking forward to sewing such long seams by hand.  I spoke to my dad about it and he asked, "Are you going to quilt it by hand?"

I said, "Well, no."

Then he asked, "Then what's the point in piecing it entirely by hand?"

I liked his answer so much that I finished the piecing by machine.  Now I am happy to show you the finished flimsy!!!  It has taken me nearly two years to complete the flimsy.  That is a long time for me.  ;)


I am really looking forward to playing with the quilting on this top.

XX,
Jasmine

Thursday, March 3, 2016

Progress on my WISP


I am happy to say that I have made more progress on my WISP (work in slow progress).  The picture above is what it looked like last October.  Five blocks were completely sewn, two blocks were swen into quarters, and there were pieces for four more blocks.

I brought the project with me to a two day conference I attended and got lots more done.


Here is seven blocks completely sewn, and the other five blocks are in quarters.


I am energized and want to get this top together soon!

XX,
Jasmine

Tuesday, March 1, 2016

Double Time: A Finished Quilt


This is yet another stash busting quilt for me.  It used up the last of this stack of fabric.


That stack of fabric was enough for six of my quilts and a quilt my niece made.  I seriously love turning stacks of fabric into quilts!  Now my old stash fits into one laundry basket sized bin.


I named this quilt, a gift for a family member, Double Time.


It uses the Double Slice Layer Cake pattern from the Missouri Star Quilt Company and has musical instruments on the back.  The instruments reminded me of time signatures and timing.  Combining the two, I cam up with Double Time.


I decided to quilt this on my little Pfaff because I can quilt so much better when I am sitting down.


I quilted it in a feathered spiral design.  It was so much fun to try something new.


It was really hard to keep the design the same size on my little machine, so I decided to purposely make them different sizes.  That made it consistently inconsistent.  Lol.


The backing fabric came from my mom's stash.  I love how it tied in the teals, blues, and the fuschias.


The binding is scrappy using some of the teal fabrics in the quilt.


I love how this quilt turned out, especially the quilting!


Quilt Stats #177
Name: Double Time
Pattern:  Double Slice Layer Cake
Fabric: From my old stash
Amount Used: 6.5 yards
Batting: Mountain Mist Polyester
Size: About 54 x 63 inches
Date Finished: February 2016
What I learned:
  • I have a lot more control and can do more intricate designs when I sit down to quilt instead of using the long arm.  
XX,
Jasmine

P.S.  I will be linking up with some of the fun parties on my sidebar.  Check them out for lots of quilty inspiration.  

Thursday, February 25, 2016

Blue and Green Race: A Finished Quilt


This is another stash busting quilt that I cut out last August, pieced last December, and finished this month.  I used my calculations for race quilts just like my previous quilt.


I decided to keep the strips the whole width of fabric (except for the first strip).  I think I prefer the half the width of fabric on quilts this size.  Either way, it is a fun fast quilt to make.

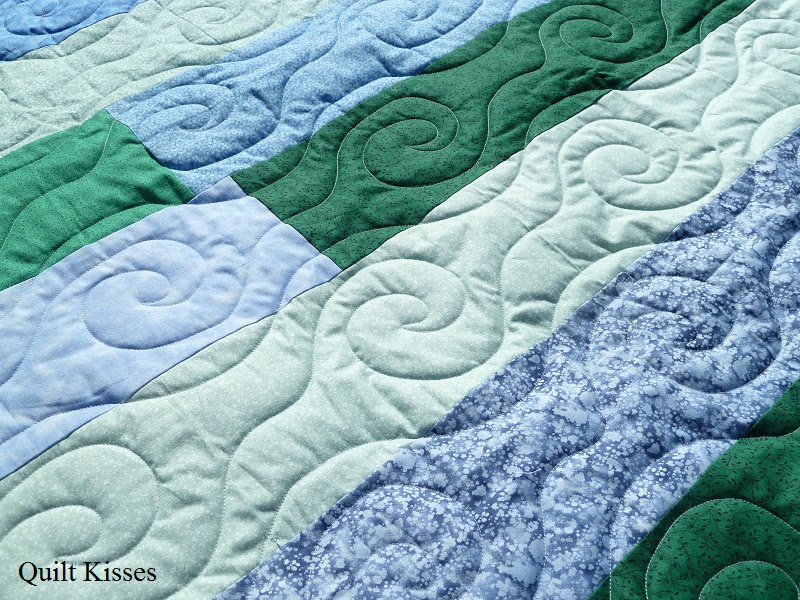
I quilted it on my mom's fusion and used a ruler for the first time on a long arm.


It felt very different from using a ruler on my sit down machine.  However, the more I used it, the better it looked.  I used the ruler in each section of the quilt, then went back and filled in the large spiral.


I was using a size 18 needle, and I didn't have any problems with skipping stitches.  However, the thread kept breaking if I quilted too far from the right to the left on the big spirals.  I am still learning the ins and outs of my mom's Fusion.  It is nice learning on fast quilts like this, which will be donated somewhere sometime this year.

The quilting design was inspired by one of Christina Cameli's designs in her book, Step-by-Step Free Motion Quilting.


The quilting design was so large (the strips finish at 5.5 inches wide) that the quilting on this lap quilt took less than two hours.


The backing is pieced using some leftover green fabric from an old border and yardage.


That green stripe came from Milky Way, my 19th quilt, finished in 2004.


The binding on this quilt used two different blues because I didn't have enough of either one.


I really am so pleased with how this quilt turned out.


Quilt Stats #176
Name: Blue and Green Race
Pattern: Race Quilt Variation
Fabric: Blues and Greens from my old stash
Amount Used: 6 yards
Batting: Mountain Mist Polyester
Size: About 54 x 66 inches
Date Finished: February 2016
What I learned:

  • I can use a ruler on the long arm.  
XX,
Jasmine

P.S.  I will be linking up with some of the fun parties on my sidebar.  Check them out for great inspiration.  

Friday, February 19, 2016

Teal and Green Race: A Finished Quilt


This is another one of my stash busting quilts.  I actually cut out the kit for it when I was cutting out fabrics for Cheetah's Eagle Project.  I pieced the quilt top one day when I needed a break from packing.  It felt good to finish a flimsy (or two) during that crazy time.

All of these strips were cut out at 6 inches wide, but then the strips were cut in half along the fold. I used about thirty half strips, sewing them together like a jelly roll race.  However, after the first two long seams (four rows together), I cut the top in thirds so that there would be twelve rows.

I was going to try a different quilting design, but the long arm kept skipping stitches when I moved the machine away from me.  This loopy spiral seemed to work better.


After talking to some people, I believe that the machine isn't in perfect timing.  I didn't have that problem when using a size 18 needle (this was quilted with a size 16 needle).  It was suggested that when moving the machine backwards the smaller needle was pushed a little forwards by the movement causing the stitches to skip.  Even with the challenges, I still think it turned out pretty good.


I added the green to this quilt because that is what I had enough of for the backing.


I actually used a blue Aurifil thread for the needle.


And I used a green Aurifil thread for the bobbin.


The tension was good and it isn't too noticeable because they were about the same value.  (I don't like using a dark thread for one and a light thread for other.  That would be a lot more noticeable.)

The binding is scrappy using some of the teal fabrics from the top.


It really was a fun fast quilt to make.   I will also be donating this one somewhere sometime this year.  :)


Quilt Stats #175
Name: Teal and Green Race
Pattern: Race Quilt Variation
Fabric: From my old stash
Amount Used: 6 yards
Batting: Mountain Mist Polyester
Size: About 54 x 66 inches
Date Finished: February 2016
What I learned:
  • I learned more about the timing on the Fusion.  
  • I really do love fast finishing quilt.

Next, I have another stash busting quilt to share.

XX,
Jasmine

P.S.  I will be linking up with some of the fun parties on my sidebar.  Check them out to see what other quilters have been making.