Tuesday, September 8, 2015

Stash Busting for a Good Cause

{A Picture Heavy Post}

20 quilt tops and backs ready to be basted.
I am so happy to share with you a proud mama moment.  :)  Cheetah is now a Life Scout in the Boy Scouts of America and is working on his Eagle Scout Project.  What is so special to me is the fact that he wanted to make quilts for other children because he knows how much a handmade quilt means to him.  He has chosen to donate 20 crib quilts to our local Project Linus.

I have had so much fun going through my older stash and putting together these quilt tops and backs which I will be donating to his Eagle Scout Project.  Some of these are from scraps and some from yardage.  I estimate there is about 70 yards of fabric represented here (hence the stash busting in my title.)


I figure that people could have donated 1.5 yard pieces to make a quilt like this...


Or I could donate a 1.5 yard quilt top (or 20).  It was cheaper donating the quilt tops because I already had the fabric and this allowed me to use it up for a good cause.  It didn't make a dent in my stash.  It took a chunk out of my stash! ;)

All quilt tops are made with 80 five inch cut squares and a three inch cut border.  They all finish at 41.5 x 50.5 inches.  You can click on any picture to see it bigger.

Flannel Pastels 1

Flannel Pastels 2

Pastel Scraps 1

Pastel Scraps 2

Eye Spy Matching {My Favorite}

Pretty Christmas 1

Pretty Christmas 2

Purple, Green, and Blue

Button Button

Country Solids

Pink Scraps

Blue Scraps

Flannel Trains {Monkey's Favorite}

Primary Rainbow

Blue and Green {Panda's Favorite}

Pink, Purple, and Blue Batiks

Scrappy Batiks 1

Scrappy Batiks 2
Teal Brights 1

Teal Brights 2 {Cheetah's Favorite}
I will be posting a tutorial later this week showing how I pieced the quilts in diagonal rows (the tube method).  But I wonder, which one is your favorite?  Do you like the scrappy or the planned quilts best?


 A big part of the Eagle Scout Project is showing leadership skills.  Cheetah now has lots of organizing to do in order to get these finished.  It is up to him to set up times and get volunteers to prepare the quilts for tying.  Then he will set up times to get all these quilts tied.  I will help with whatever he asks, but my part is finished.

XX,
Jasmine

P.S.  I will be linking up with some of the fun parties on my sidebar.  Check them out for lots of fun quilty inspiration.

Thursday, September 3, 2015

Cranes: A Custom Finish


My mom has now finished a queen size quilt for all eight of her children.  I have quilted three of them for her.  This quilt is for my brother W.  My mom had all the blocks pieced for a long time, but her health kept her from finishing it for a few years.

I recently went to her house and helped her pin the rows together.  Then I measured, cut, and pinned the borders for her while she sewed.  Another day I quilted it on her Fusion.  I could have quilted it on my Tiara, but I didn't feel like basting a queen size quilt.


This is the fourth Irish Chain quilt I have quilted, and the first one with an all over design.  I quilted swirls in the center.


And swirls in the border, but not in the stop border.  I used the walking foot on my machine to stitch in the ditch around the inner border.


Two of the four prints were directional, and my mom did a great job keeping all of the cranes and waves going in the same direction.


The backing fabric is the same as the background fabric.  I was careful to keep it going in the same direction as it did on the top.


The swirls were a little more difficult to quilt on the long arm, but I think they still looked okay.


Once it was all quilted I sewed the binding on.  I even stitched it to the back by hand for her.


My mom has an eagle quilt she wants to finish for my dad, then she will work on whatever she feels like.  She is now caught up with her children and grandchildren quilts.

XX,
Jasmine

P.S.  I will be linking up with some of the fun parties on my sidebar.  There is something fun for every day of the week.

P.P.S.  The quilt is not faded.  I found out after I took the pictures and brought the quilt to my mom that there were little finger prints and smudges on my lens.  I now have a clean lens... I think.  ;)

Tuesday, September 1, 2015

Family Reunion Quilt: A Custom Finish


My mother-in-law and her brother were in charge of the family reunion this year.  They decided to have it be honoring the ancestors we all have in common (their grandparents).  We participated in activities they enjoyed and were good at: sawing boards, hammering nails, making butter, making quilts, and eating good food.

My mother-in-law printed pictures of our ancestors on specially treated fabric and purchased fabric for the rest of the quilt.  She came over one day and we cut out the quilt and laid it out on my design wall.  All of the blocks finish at 4 by 6 inches except for the vertical pictures.  We added a one inch border around them to make them finish at 6 x 8 inches.

After she left I pieced it in columns, sewed the columns together, pin basted the quilt, and added the binding by machine.  All in one day.  It went very quickly.


Then the night of the reunion tying the quilt was one of the activities.  Everyone who came, shared things in common with the ancestors, and participated in the activities earned tickets.  Towards the end of the night the quilt was raffled off.  My mother-in-law's cousin won the quilt and loved it!


This is the only picture I was able to get of the finished quilt.  Cheetah is holding it up right before they had the drawing after dusk.

It was fun working on this quilt and learning more about the ancestors.  My husband and Monkey both have his name for a middle name.

XX,
Jasmine

P.S.  I will be linking up with some of the fun parties on my sidebar.  Check them out for lots of great quilty inspiration.

Thursday, August 27, 2015

Spring Sorbet: A Finished Quilt


I had so much fun finishing this scrappy jelly roll race quilt.  I estimate that the scraps were the equivalent of 2.5 jelly rolls.  I don't know if the machine quilting, the first 55 yard seam, or remembering all the other quilts was the most fun. (Check out my previous post for more details on the piecing)  All in all, it was very enjoyable for a quilt made just for fun.  ;D

I knew I wanted to do an all over quilting pattern on this quilt.  The difficulty was in deciding which one to try, because I wanted to try something new.  I ended up choosing a large paisley quilting design.  I quilted it in a light gray Omni thread.


I started the quilting in the center then continued to work my way around the quilting multiple times switching from clockwise to counterclockwise.  I was able to quilt in that order because I have lots of room with my sit down quilting machine.  I quilted the entire full size quilt without rotating the quilt once.  I love my Tiara!  You can see how I started it in the picture below.  It is where the four paisleys meet together at a point.


I love how the quilting looks in the sunshine and how it helps blend all the strips together.  I purposely left in some slightly darker strips, because I think it adds interest to an otherwise light quilt.


I had plans for a two sided quilt which would have eight inch cut squares across the entire back, but decided to simplify the backing.  There is just a section four squares across down the length of the quilt.


There are two fabrics with four squares each and two fabrics with only one square each.  The rest all have two squares each.  My boys enjoy looking for the matches and finding the oddball fabrics.  You can see the entire backing in the picture below.


The light fabrics all came from my stash and the blue heart fabric came from my mom's stash.  The only thing I had to purchase was the binding.  I chose a fun purple dot print, because purple is my favorite color.  I first sewed it to the back, then sewed it to the front by machine.  I find myself binding more and more quilts by machine.


I was thinking of calling the quilt "Sherbet Strips" but Cheetah vetoed that name.  He came up with the name "Spring Sorbet."  He said that sorbet sounded lots better than sherbet.  Lol.


I made this quilt just for fun, and it is now hanging out in my living room.  I think it looks so pretty on my sofa.


And here is one more picture  of the whole quilt top just for fun.  You can definitely see more of the prints and less of the quilting in the shade.


Quilt Stats #145
Quilt Name: Spring Sorbet
Pattern: Race Quilt Variation 
Fabrics Used: From my stash
Amount Used: 13 yards
Size: About 80 x 96 inches
Batting: Hobbs 80/20
Date Finished: August 2015
What I Learned:

  • It is so much fun to use up scraps and see how a quilt will turn out.
  • It is more fun to sew a 55 yard seam than press a 55 yard seam.  (I like to press after each seam rather than once the entire top is sewn.)
  • I need to slow down a little with my machine quilting.  The design was so large that I found myself quilting faster than my stitch regulator could handle.  


You will probably see more of this style of quilt from me in the future.  I love the random piecing in long strips.  It is a great stash buster!

XX,
Jasmine

P.S.  I will be linking up with some of the fun parties on my sidebar.  Check them out for lots of quilty inspiration.

Tuesday, August 25, 2015

Keeping a Quilting Log


Once a month I attend a long arm quilting club at my local quilt shop.  A few months ago they asked if I would give a presentation at one of the meetings.  At first my answer was "no."  I didn't know what I could share with the ladies.  Most of my quilting is done sitting down.  I can count on two hands the number of quilts I have actually quilted on a long arm machine.

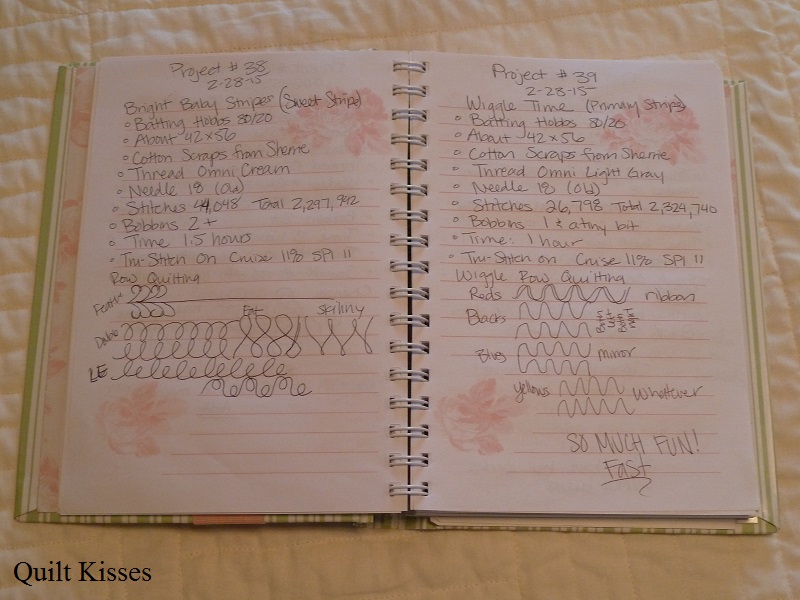
After that initial surprise, I got thinking about it and realized that maybe I did have something I could share.  I am a very organized person and thought that I could share how I keep records of my quilts.  So I went to the manager and told her my idea.  She loved it!  She was particularly interested in my quilting log.  I have found my quilting log to be very helpful, and thought that it would be good to share on my blog as well.

My quilting log is kept in a journal one of my friends gave me.  The kind that you put in a cupboard until you know what to do with it.    I started using it when I purchased my Tiara and was so grateful for a cute journal I already had.  I use it to keep track of all projects I quilt with my Tiara.  I think I need to start another one for projects quilted on my domestic machine.  I have already started one for my mother for projects quilted on her Fusion.  

I keep my quilting log on the shelf underneath my Baby Lock Tiara.  It is right there so I remember to write in it every time.  In it I include this information:

  • The project number (I have quilted 51 projects on my Tiara)
  • The dates I quilted that project
  • The name of the project
  • The batting I used
  • The size of the project
  • The types of fabrics used (cotton, minky, flannel...)
  • The thread used (type and color)
  • The needle used
  • The total number of stitches (I love the stitch counter on my Tiara)
  • How many bobbins used
  • How long it took to quilt the project
  • Any special settings on my machine: stitches per inch, cruise speed, maximum speed... On a domestic machine your settings might include: stitch length, feed dogs up or down, tension setting, needle position...
  • What designs I used (name, diagram, description...)
  • Any notes or other things I want to remember
Here are a couple pictures showing pages from my quilting log.  


I find this helpful for a number of reasons:

  • I can review previous quilts of the same size and similar design to guess how many bobbins to fill.  (I hate stopping in the middle of a project to wind more bobbins.)
  • I can remember what needle worked best for which thread type.
  • I can remember what kind of batting or thread I used in a quilt. 
  • I can remember any special settings for different types of thread or fabric.  
  • I can keep track of any challenges I need to overcome in the notes section. (I had a hard time with Omni thread in the bobbin at first and tried different things to solve that issue.  Turns out a different bobbin case worked much better.)
  • I can review designs I have already tried and what worked well.  
  • I love numbers, and find keeping track of the total number of stitches fascinating.  I have 3.3 million stitches on my Tiara.  

Do any of you keep a quilting log or do you have any suggestions for what to include?

I will be sharing more ideas I have for keeping records of your quilts in the future.  In case you missed it, I have already blogged about my quilt photo albums/scrapbooks here.

XX,
Jasmine

P.S.  I will be linking up with some of the fun parties on my sidebar.  Check them out for lots of quilty inspiration.

Saturday, August 22, 2015

Scrap Quilt in Progress

First, I want to say thanks for all the encouragement and well wishes during my blogging break.  We had a lot of fun spending time together at the end of summer with less time on the computer.  My boys are now back in school and we are trying to settle into our routine.  I am looking forward to blogging as part of my routine.  :)


I have been saving up my scraps of light 2.5 inch strips for a few years.  The plan for these scraps has changed many times.  Some ideas included a string quilt, a granny square quilt, a scrappy trip quilt, and a jelly roll race.  At first I wasn't going to do a jelly roll race, because I already made one with some of these fabrics.   However, I just felt like doing some simple sewing and using up all these scraps in one project.

So I fluffed up my strips and set them by my sewing machine.  (They took up less than half the tub when they were laid nice and flat.)


I just randomly sewed them all end to end in one great big long strip.


I found the two ends, matched them up, and started sewing... and sewing... and sewing...

I measured the strip after the first seam and it was about 55 yards (1,980 inches).   I had to change the brand new bobbin of 50 weight Auriful partway through the seam.  Evidently I can't fit 55 yards of Aurifil thread on one bobbin.  This was the longest continuous seam I have ever sewn.  Previously my longest seam was about 800 inches for a jelly roll race (22 yards).  Before that my longest seam was only 114 (3+ yards) inches for a large border.  Please note that is one seam, not chain piecing.  Ironing a 55 yard strip was not nearly as much fun as piecing it.  ;)

Once I knew how long my first seam was, I used my calculations for jelly roll race variations to figure out how big my quilt would end up.  I decided to continue sewing until I had a 16 strip wide section.  Then I divided it in thirds, and used my design floor to determine the placement for the last three sections.


In one day I had a simply pieced full size quilt (about 80 x 96 inches).  Totally love it!


One of the most fun things about this quilt was thinking of all the other quilts whose leftovers I was using.  There is even one scrap from my very first quilt.  It is the light pink calico near the bottom left corner in the picture below.


I used some larger scraps plus yardage for the backing.


I can't decide if I like the back or the front best.

Here is the quilt basted and ready to quilt.  :D


Monkey had a lot of fun watching me baste this quilt.  Once I finished I asked him what he thought.  He said, "It's cool.  I like it.  What's it for?"

I told him it was just for fun.  There's nothing wrong with making a quilt just because you already have the fabric and it sounds like fun, right?

XX,
Jasmine

P.S.  I will be linking up with some of the fun parties on my sidebar.  Check them out to see what other quilts have been doing.

P.P.S.  I'm sorry if anyone is receiving this twice.  I had a small operator error.  :)